
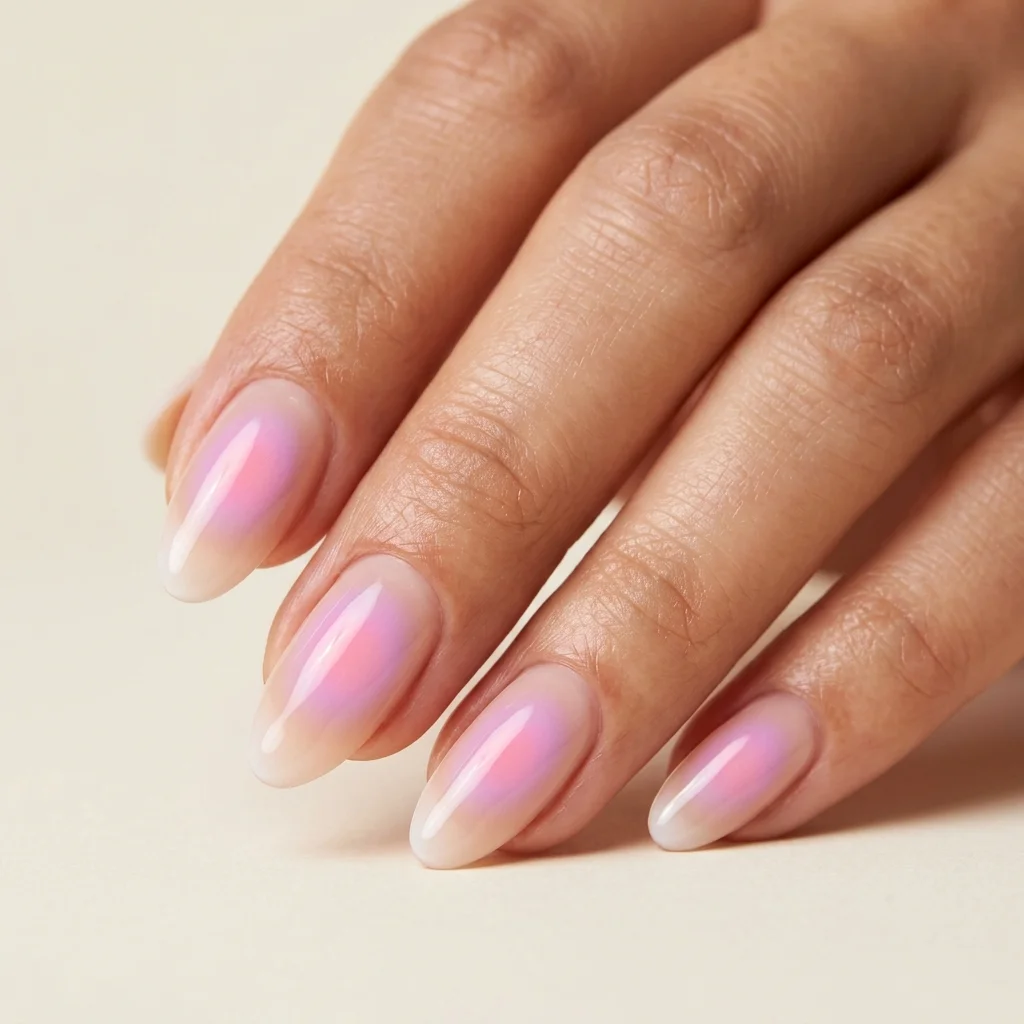
Aura Nails with Eyeshadow: The Viral Hack for Perfect Blending
Alright, let's talk about the aura nail trend that's taken over our feeds. You know the one—that soft, ethereal, blurred halo of color that looks like it was airbrushed by a pro. But here's the thing: most of us don't have an airbrush machine just lying around at home. That's where this genius TikTok hack comes in. I've been doing nails for over a decade, and when I first saw someone using eyeshadow to create these aura nails, I thought it was brilliant. It's all about that perfect, seamless blend. If you've been wanting to try the look without the fancy equipment, you're in the right place. This aura nails eyeshadow tutorial is going to break it all down for you.
Why Eyeshadow Works So Darn Well for Aura Nails
So, why does this tiktok aura nail hack actually work? It comes down to the properties of eyeshadow. Eyeshadow, especially loose pigments and many pressed powders, is finely milled. This means it's incredibly easy to blend, much like a soft-focus filter for your nails. When you use it over a tacky base, it melts into a seamless gradient that can be hard to achieve with regular polish alone. You get that diffused, "lit-from-within" look that defines a true aura manicure. It's the key to those easy aura nails at home that look professionally done.
- Fine Pigment: The powder is designed to be buildable and blendable, making it perfect for creating soft transitions.
- No Bulky Layers: Unlike layering multiple polish colors, the shadow sits lightly on the nail, preventing a thick, lumpy appearance.
- Color Range: You likely already own eyeshadows in a million shades, giving you endless aura color combos without buying more polish.
Everything You'll Need: Your Aura Nails Toolkit
Let's gather our supplies. Having everything ready makes the process smooth and fun. Here’s what I use and recommend.
- Base Coat & Top Coat: A good base protects your natural nail. A high-gloss top coat is non-negotiable to seal the eyeshadow in and make it last.
- Neutral Base Polish: A nude, soft pink, or sheer milky white polish. This is your canvas. It should be opaque in 1-2 coats.
- Eyeshadow(s): This is the star. You can use:
- Loose Pigment: My favorite for intense color payoff and the easiest blend.
- Pressed Eyeshadow: Works great too. Simply crush a small amount of a shimmery or matte shade into a fine powder using the back of a spoon or a small mortar and pestle.
- A Small, Stiff Brush: A flat shader eyeshadow brush, a small blush brush, or even a clean, fluffy eyeshadow blending brush. Avoid anything too soft and floppy.
- Liquid Latex or PVA Glue: (Optional but highly recommended) This is for creating a "peel-off" barrier around your cuticles for super easy cleanup. It's a game-changer.
- Small Makeup Sponge or Applicator: For picking up and pressing on the pigment.
- Isopropyl Alcohol & Spray Bottle: To dampen the brush slightly, which helps the pigment adhere and blend flawlessly.
Step-by-Step: Creating the Perfect Eyeshadow Aura Nails
Okay, here's the main event. Take your time with each step—this isn't a rush job. I'll walk you through my exact process.
Step 1: Prep and Protect
First, prep your nails as you normally would: shape, push back cuticles, and cleanse the nail plate with alcohol to remove any oils. Apply your base coat and let it dry completely. Now, apply your chosen neutral base color—two thin coats, letting each dry fully. This dry base is crucial; if it's tacky, the shadow will go on too heavy and uneven. Once dry, if you're using the peel-off barrier trick, now's the time to carefully apply the liquid latex or PVA glue around your cuticles and the skin around your nail. Let it dry to a gel-like consistency.
Step 2: The Eyeshadow Aura Application
This is where the magic happens. Dab your small, stiff brush lightly into your crushed eyeshadow or loose pigment. You don't need a lot. Then, lightly spritz the brush bristles with your alcohol spray—just enough to dampen them, not soak them. The alcohol helps the powder adhere to the nail surface without creating a muddy paste.
Now, looking at your nail, identify the center of your "aura." This is usually the center of the nail or just above, depending on the look. Gently tap or stipple the brush onto that central spot. Don't swipe or drag yet. You're depositing the color.
Then, using a gentle circular motion, start to blend the color outward from the center toward the cuticle and the free edge. Use a very light hand. The goal is to create a gradient that's most concentrated in the center and fades out to nothing at the edges. It should look like a soft, glowing orb of color.
Step 3: Building Depth (Optional)
For a more dramatic aura, you can layer two shades. Once your first, lighter color is blended, take a slightly darker or complementary shade (or even a glitter) on a clean, damp brush. Apply this smaller concentric circle right in the center of the first aura. Blend it out so it melts into the first layer. This creates amazing dimension.
Step 4: Seal and Clean Up
This is the most important step! Let the shadow set for a minute. Then, apply your top coat. I cannot stress this enough: use a thick, high-quality top coat and apply it in one or two confident, floating strokes. Do not let the brush bristles drag and disturb the powder. If you do, you'll streak it. The top coat will seal the eyeshadow, deepen the color, and give you that glossy finish. While the top coat is still wet, if you used a peel-off barrier, you can now simply peel it off, taking all the excess shadow with it for a perfectly clean look. If you didn't use a barrier, use a small brush dipped in acetone for cleanup.
Pro Tips from My Salon Chair
After trying this on countless clients and on my own nails, here are my top tips for success.
- Start with Less: You can always add more pigment, but it's harder to take away. Build up the color gradually.
- The Alcohol Mist is Key: It prevents fallout and helps the pigment stick, not fly everywhere.
- Matte vs. Shimmer: Both work, but they give different vibes. A matte shadow creates a very soft, watercolor-like aura. A shimmer or glitter shadow gives you that dazzling, glowy aura. Experiment!
- Clean Your Brush: Wipe or tap off excess pigment from your brush between nails to avoid muddy colors.
- Dry Time Matters: Your base polish must be 100% dry. If it's even slightly tacky, the shadow will apply too thick and become patchy when you blend.
| Aspect | Eyeshadow Aura Hack | Traditional Airbrush |
|---|---|---|
| Equipment Needed | Common household/makeup items | Specialized airbrush machine & compressor |
| Skill Level | Beginner-Friendly with practice | Steeper learning curve |
| Color Cleanup | Easy, especially with peel-off barrier | Can be messy, overspray possible |
| Finish & Durability | Excellent, sealed with top coat | Excellent, sealed with top coat |
FAQs About the Eyeshadow Aura Nail Hack
Will eyeshadow ruin my manicure or stain my nails?
Absolutely not, as long as you use a base coat. The base coat acts as a protective barrier between the pigment and your natural nail. The eyeshadow simply sits on top of the polish layer.
How long will aura nails with eyeshadow last?
With a good base coat, proper application, and a quality top coat, this manicure can last just as long as any regular polish manicure—about 5 to 7 days without chipping. The top coat is the hero here, locking everything in.
Can I use any eyeshadow?
Yes, but results vary. Finely milled powders (loose or pressed) work best. Some very chunky glitters might not blend as smoothly. I always recommend doing a test on a piece of paper or a nail tip first to see how the pigment blends.
What's the best top coat to use without smearing the design?
Look for a top coat that's described as "thick," "plumping," or "gel-effect." I like ones with a wide, flat brush that allows you to apply it in a single, steady swipe without going back and forth. Essie Gel Couture Top Coat or Sally Hansen Miracle Gel Top Coat are great drugstore options.
Can I do this over gel polish?
You can, but the process is slightly different. You would apply and fully cure your gel color, then cleanse the inhibition layer. After that, apply the eyeshadow. You'll then need to apply a non-wipe gel top coat and cure it to seal the powder. Do not use a regular polish top coat over cured gel.
So there you have it! This aura nails eyeshadow tutorial proves you don't need fancy tools to nail a major trend. It's creative, forgiving, and lets you use what you already have. Give it a try this weekend, play with some color, and get ready for the compliments. Your nails are about to glow.