The Bubble Nails Trend is Back: How to Create Textured Foam Nails
I’ve been doing nails for over fifteen years, and I’ve seen every texture come and go. Velvet, sugar, croc—you name it. But there’s one that keeps making waves, and right now, it’s exploding all over my TikTok feed. Yep, I’m talking about the bubble nails trend 2026. It’s playful, it’s tactile, and it’s surprisingly easy to DIY with the right technique. If you’re ready to add some whimsical, 3D flair to your set, you’ve come to the right place. Let’s break it down.
This isn't just a repeat of the past. The 2026 version is all about controlled chaos—more refined, more customizable, and perfect for making a statement. I've been playing around in my studio, and I'm excited to share my perfected method.
What Exactly Are Bubble Nails?
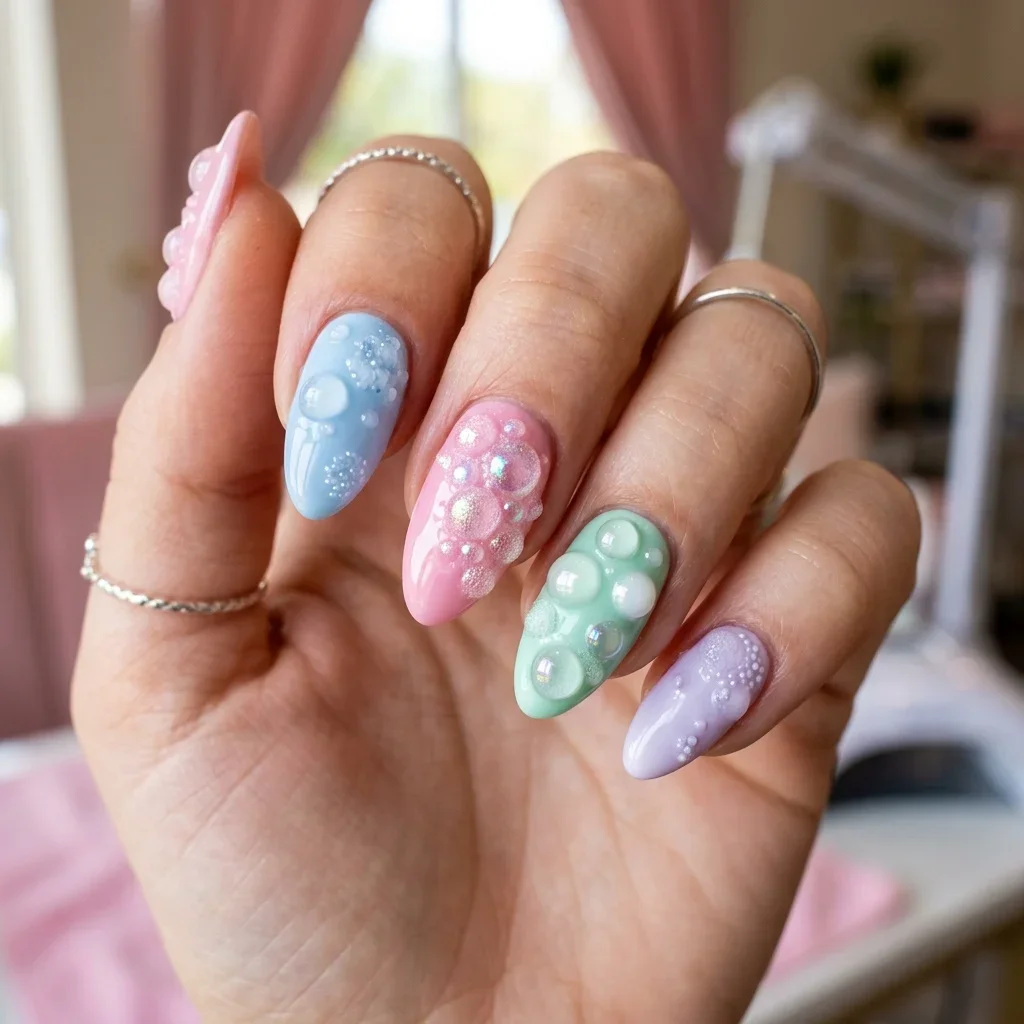
Think of it as a sophisticated take on the classic bath bomb look. Instead of a flat, smooth surface, we’re creating a raised, bumpy texture that mimics the look of sea foam or soap suds. It’s an abstract design that catches light beautifully and adds instant depth. The best part? You don’t need a fancy, expensive molding paste. A common kitchen staple is our secret weapon.
Gathering Your Supplies: The Professional's Kit
Using quality products makes all the difference in longevity and ease of application. Here’s what I have on my nail table for this look:
- Nail Prep Supplies: Nail file, buffer, cuticle pusher, dehydrator, and non-acidic primer.
- Base & Structure: A sturdy base coat. For this, I prefer a rubber base or builder gel in a bottle for added strength.
- The Magic Ingredient: Clear liquid dish soap. I use a simple, dye-free brand. The surfactants in the soap create the bubbles when agitated with gel.
- Colorful Gels: You’ll need at least one opaque gel polish color and a bottle of clear builder gel or top coat. This is key—the clear gel creates the foamy "bubble" layer.
- Tools: A small, firm detailing brush or a dotting tool. A silicone-tipped tool is great for manipulation.
- Light: A reliable LED/UV lamp.
- Finishing: A non-wipe top coat to seal everything in.
Step-by-Step Guide to Crafting Textured Bubble Nails
Step 1: Nail Prep is Non-Negotiable
Any textured nail art will highlight imperfections, so prep work is crucial. File your nails into your desired shape. Gently push back cuticles and lightly buff the nail plate to remove shine. Wipe with a lint-free pad and alcohol to dehydrate. Apply your dehydrator and primer, following the product’s instructions.
Step 2: Build a Strong Foundation
Apply a thin layer of your base coat or rubber base. Cure fully. I then like to apply a layer of builder gel to create a strong, smooth canvas, especially if I’m working on a natural nail. Cure again under your lamp. This solid foundation prevents the textured design from cracking or lifting.
Step 3: Apply Your Color Base
Now, paint on your chosen gel polish color. You want full, opaque coverage. I often do two thin coats, curing between each one. This will be the base color that peeks through the bubbles. Let it cure completely. At this point, your nail should look like a perfect, solid-colored nail.
Step 4: The Bubble Technique – This is Where the Magic Happens
This is the core of the bubble nails trend 2026. Grab your clear builder gel and your dish soap.
- Create Your Foamy Medium: Squeeze a small bead of clear gel onto your palette or a piece of foil. Add one single drop of dish soap. Too much soap will make it unstable and hard to cure.
- Agitate to Activate: Using your detailing brush, whip the mixture together vigorously. You’ll see it start to foam up and create a thick, mousse-like texture with hundreds of tiny bubbles. It should look like stiff whipped cream.
- Apply the Foam: Quickly—because it starts to settle—dab the foamy gel onto your nail. Don’t paint it on; use a stippling or dabbing motion to build up texture. You can cover the whole nail or just create a feature on one or two accent nails. Less is often more; you can always add more.
- Refine and Shape: Use your silicone tool or the tip of your brush to gently manipulate the bubbles. You can push larger bubbles to the surface or create swirling patterns. Don’t overwork it, though—the beauty is in the imperfect, organic texture.
Step 5: Cure the Structure
This is critical. Place the nail under your LED lamp and cure for a full cycle. I recommend at least 60 seconds. The clear gel with the soap bubbles will harden perfectly, locking in that foamy texture. You’ll feel a slight tackiness after curing, which is normal for a no-wipe gel. Do not touch it!
Step 6: Seal and Protect
Because the texture is uneven, a regular top coat will just pool in the crevices and ruin the effect. Instead, take a small amount of clear builder gel and use your brush to carefully apply it over the entire textured surface, encapsulating the bubbles. Use a light touch. This layer will fill in micro-gaps and add strength without flattening the design. Cure this sealing layer fully.
Step 7: The Final Finish
Once cured, you can opt for a matte top coat to accentuate the texture beautifully, or a glossy top coat for a wet, bubble-bath look. Apply and cure according to the product instructions. That’s it—you’ve just created a salon-quality textured nail art!
Pro Tips & Troubleshooting from My Studio
- Customize Your Color: You can mix a drop of colored gel into your clear gel before adding soap for a monochromatic foam effect. Pastels look particularly dreamy.
- Longevity: Proper prep and that final builder gel encapsulation are key. With this method, I see clients wear these sets comfortably for two weeks or more.
- Texture Settling: If your mixture starts to settle or lose volume, give it a quick whip again. It’s ready for more dabbing.
- Soak-Off vs. Hard Gel: Using a soak-off builder gel for the foaming step makes removal easier. If you use hard gel, you’ll need to file it off.
Frequently Asked Questions
Q: Is dish soap safe to use on nails?
A: The amount we use is minuscule—just a single drop mixed into gel. The alcohol in the gel and the curing process render it inert. It’s a trick nail techs have used for years in small quantities for special effects. Always use a simple, dye-free formula.
Q: How do I remove bubble nails?
A: If you used soak-off gel products, file the top coat to break the seal, then soak cotton pads in pure acetone and wrap your nails for 10-15 minutes. The texture will crumble off gently. Do not force or pick it.
Q: Can I do this with regular nail polish?
A: Unfortunately, no. This technique relies on UV/LED-curing gel. Regular polish won’t cure with the soap and will never set, resulting in a goopy, uncured mess.
Q: Why is the 2026 bubble nails trend different?
A: It’s more about controlled, artistic application. We’re using it as a feature art, like on a ring finger, or in ombré blends with smooth surfaces. It’s less about overwhelming volume and more about strategic, eye-catching texture.
The bubble nails trend 2026 is a fantastic way to unleash your creativity. It’s messy, it’s fun, and the results are always unique. Give it a try on your next set, and don’t be afraid to experiment. Tag me in your creations—I’d love to see what you come up with!