
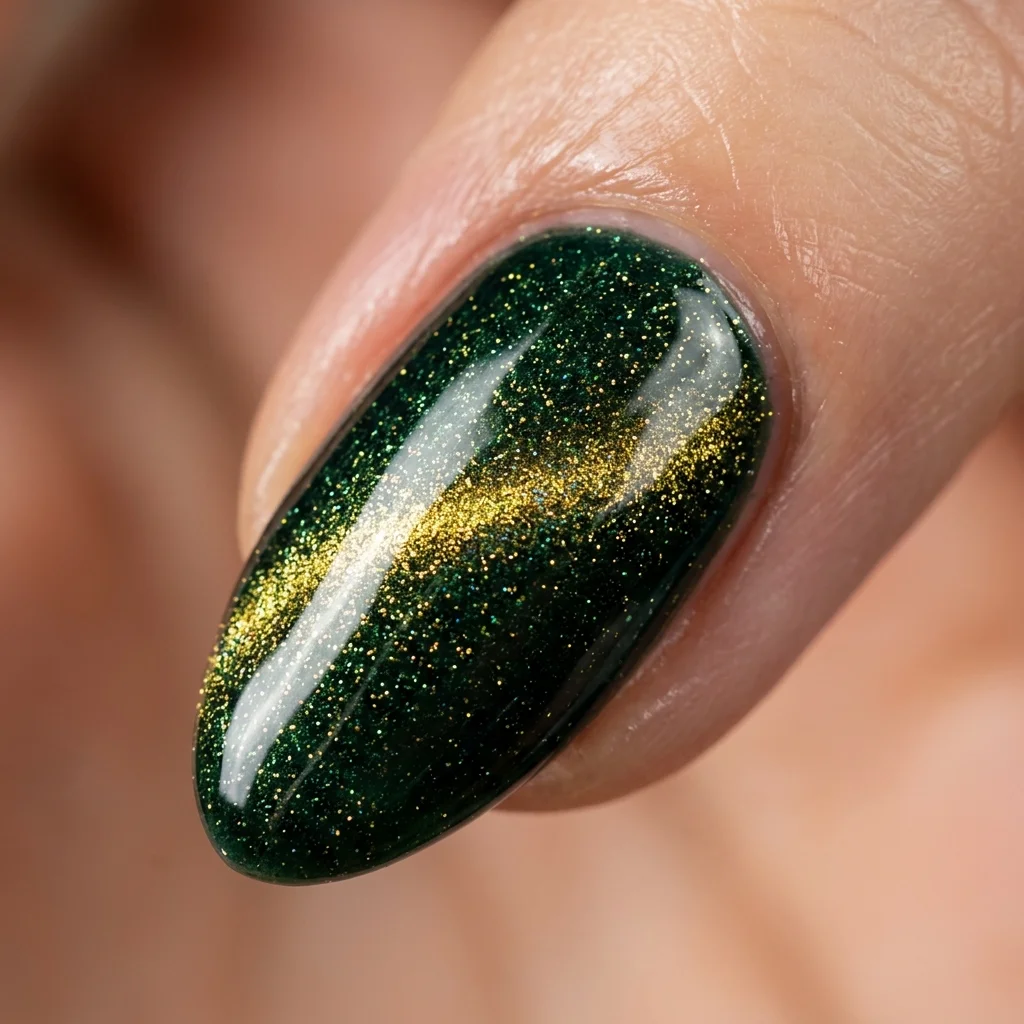
Okay, Let's Talk Cat Eye Magic: A Real Tech's Guide to Magnetic Polish
So, you've seen those mesmerizing, deep, velvety lines that shift and shimmer on someone's nails, and you thought, "How in the world do they do that?" That, my friend, is the magic of cat eye gel nail polish. As a nail tech who's played with dozens of these kits, I can tell you it's way easier than it looks, and the "wow" factor is absolutely through the roof. I'm going to break down exactly how to get that stunning, multidimensional effect at home.
In this cat eye gel nail polish tutorial, we're not just slapping on polish. We're diving into the prep work that makes or breaks the look, I'll walk you through my five favorite magnet techniques (from classic to totally unique), and I'll even share which magnetic gel polish sets I think are worth your money. Grab your favorite beverage, your lamp, and let's get started.
The Foundation: Prepping for Perfection
Before we even think about the cool magnet part, we need a flawless canvas. If you skip this, your beautiful cat eye design will lift or chip, and all that work is for nothing. Here's my non-negotiable prep routine:
- Nail Prep is Key: Push back and trim your cuticles. Lightly buff the nail surface to remove any shine and create texture for the gel to grip. Wipe away all dust with a lint-free wipe and alcohol cleanser.
- Base Coat Application: Apply a thin, even layer of a high-quality base coat gel. Cure it fully under your LED lamp (usually 30-60 seconds). This creates the sticky foundation layer for everything that comes next.
- Choose Your Base Color: Most cat eye gels are sheer with metallic particles. For maximum depth, I almost always start with a solid, opaque color underneath. A classic black makes the magnetic particles pop intensely. A deep blue or plum creates a gorgeous, rich background. Apply one or two coats, curing between each, until you have full, even coverage.
Main Event: Applying Cat Eye Gel Polish
Here's where the fun begins. Your cat eye gel is a special formula filled with tiny, metallic particles. The magnet is what moves them around to create the design. The process is the same no matter which technique you use below.
- Shake It Up: Give your cat eye gel bottle a good shake to disperse those metallic pigments evenly.
- Apply a Thick-ish Coat: Using the brush from the bottle, apply a slightly thicker coat of gel than you normally would. You want enough product for the magnet to work with, but not so much that it floods your cuticles.
- The Magnet Moment: This is the crucial step. While the gel is still wet and uncured, hold the magnet over your nail. I usually hover it about 1/8th of an inch (a few millimeters) above the surface. Hold it steady for 5-10 seconds. You'll literally see the particles move and align into your chosen pattern!
- Cure Immediately: Once you're happy with the design, immediately cure the nail under your lamp. The light locks those particles in place permanently.
- Seal the Deal: After curing the color, apply a generous layer of no-wipe top coat gel. This gives that incredible, glossy finish and protects your hard work. Cure one final time.
5 Stunning Magnet Techniques You Have to Try
The standard straight line is just the beginning. Changing the magnet's position or motion completely transforms the look. Here are my top five techniques.
1. The Classic Cat Eye (Straight Line)
This is the go-to, elegant look. Use the straight-line side of your magnet. Hold it horizontally across the center of your nail, parallel to your cuticle line, and don't move it. The particles will form one clean, vertical stripe right down the middle of the nail, like a cat's pupil. It's sophisticated and works perfectly for any occasion.
2. The Multi-Line or Holographic Effect
Instead of one bold line, you can create several parallel lines for a more textured, holo-inspired vibe. To do this, use the same straight magnet, but instead of holding it still, very slowly and smoothly rock it back and forth (towards and away from you) while it's hovering over the nail. The particles will form multiple, closely spaced lines. Practice the speed—too fast gets blurry, too slow might merge the lines.
3. The Star or Burst Effect
This one is a total crowd-pleaser. If your magnet has a dot or circle on it, you're in luck. Hold it directly over the center of the nail and hold it still. The particles will radiate outwards from the center point in a starburst pattern. It looks like a celestial explosion on your fingertips. If your magnet doesn't have a dot, you can use the very tip of the straight line magnet held vertically to the nail to achieve a similar, more subtle burst.
4. The Diagonal or "Wink" Effect
For a dynamic, asymmetric look, hold the straight-line magnet at a 45-degree angle across the nail. The particle line will follow that diagonal, creating a sleek, modern "wink" shape. You can also do this on just one nail as an accent for a super chic look.
5. The Smoky or Drag Effect
This creates a beautiful, blended, smoky effect instead of a sharp line. After applying the cat eye gel, place the magnet on one side of the nail (say, the left edge). Hold it for 2-3 seconds to pull particles to that side. Then, while keeping it hovering, slowly drag the magnet across the nail to the opposite side. The particles will leave a trail, creating a gorgeous gradient or smoky haze. It's a bit more advanced but so worth it.
My Top Magnetic Gel Polish Kit Picks
Not all kits are created equal. You need a strong magnet and a polish with a high density of responsive particles. Here’s a quick comparison of sets I've used and loved.
| Product Name | Magnet Strength | Color Payoff | Best For |
|---|---|---|---|
| Gelish Cat-Eye Collection | Very Strong | Excellent on dark bases | Beginners & pros wanting reliable, vibrant results. |
| Madam Glam Cat Eye Gels | Strong | Good range of unique colors | Creative techs looking for variety beyond black/silver. |
| Saviland Magnetic Gel Kit | Strong (often double-ended) | Great, affordable option | At-home users on a budget who want to try multiple techniques. |
| Beetles Cat Eye Gel Set | Moderate to Strong | Good, with lots of included tools | Someone starting from scratch who needs a full kit with brushes and magnets. |
Pro Tips from Behind the Desk
- Work One Nail at a Time: Don't apply the cat eye gel to all five fingers and then try to magnetize them. The gel starts to set and the particles won't move. Do one nail from start to finish, then move to the next.
- The Magnet Sticks? That's Okay: If your magnet accidentally touches the wet gel, don't panic! Just quickly pull it straight up. You might get a small textured spot, but it often still looks cool. Just try to avoid it for a clean look.
- Clean Your Magnet: Wipe your magnet with a little alcohol after each use. Dried gel on it will ruin its effectiveness.
- Experiment with Layering: Try magnetizing a layer of cat eye over a different color. Silver cat eye over red is stunning. You can also apply a second, sheer layer of a different cat eye color over your first cured design for more complexity.
- Use a Dotting Tool for Accuracy: If you're struggling to get the magnet close without touching, a dotting tool can be your best friend. Use the rounded end to gently nudge the magnet into the perfect position.
FAQ: Your Cat Eye Questions, Answered
Q: Can I use a regular magnet if I lose the one that came with my kit?
A: You can try, but household magnets are usually not strong enough or shaped correctly. They might create a very faint effect, but for that sharp, defined line, you need the specific high-power magnet designed for nail gels.
Q: Why isn't my cat eye effect showing up?
A: The most common culprit is using the gel over a light or pastel color. The metallic particles need a dark background to really stand out. Also, check that your magnet is close enough and that you're holding it still for the full 5-10 seconds.
Q: Can I do cat eye designs with regular nail polish?
A: No. Cat eye gel nail polish has a special formula with suspended metallic particles that only respond to a magnet. Regular polish doesn't have this. The gel formula also gives you the working time you need before curing.
Q: How long does cat eye gel last?
A: Just like any gel manicure, with proper prep and application, you can expect 2-3 weeks of wear without chipping. The design itself doesn't fade or move once cured.
There you have it! You're now equipped with the knowledge and techniques to create salon-worthy cat eye nails right at home. It’s all about that prep, that thick coat, and that confident magnet hold. Now go play, and get ready to receive all the compliments.
