
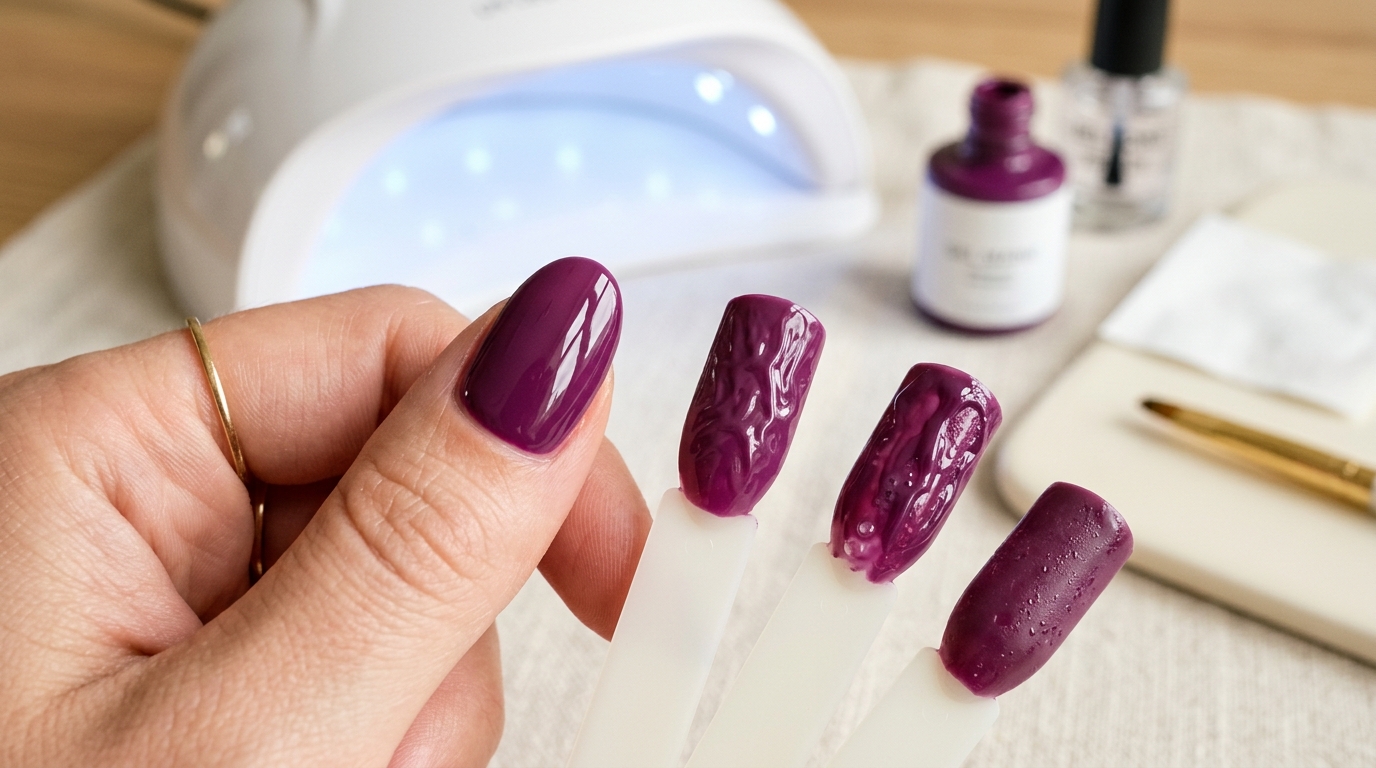
When gel wrinkles, stays soft, shrinks away from the edge, or lifts early, the lamp is only one possible culprit. Cure problems usually come from a system mismatch: product thickness, formula, wavelength, placement, lamp condition, or timing. Troubleshoot the whole system before buying a stronger light.
What the symptom is trying to tell you
| Symptom | Likely contributors | First check |
|---|---|---|
| Wrinkled surface | Coat too thick, pigment density, insufficient cure, incompatible lamp | Apply a thinner coat; verify system compatibility |
| Sticky layer | Intentional inhibition layer or under-cure | Read product instructions; distinguish tacky from soft |
| Gel shrinks from edges | Surface contamination, old product, application tension | Prep, coat thickness, and product age |
| Thumb stays soft | Angle/shadow, thumb outside diode zone | Cure thumb flat and separately |
| Heat spike | Thick builder layer, rapid polymerization, sensitivity | Remove hand; use approved low-heat procedure |
| Lifting soon after service | Prep, skin contact, incomplete cure, incompatible system | Do not assume more topcoat fixes the base |
Wrinkling is usually a thickness problem before it is a wattage problem
Gel cures from the light-exposed surface inward. A coat that looks thin in the bottle can be too thick on the nail, especially with white, black, neon, or highly pigmented colors. The surface hardens while the lower layer remains mobile, then contracts or wrinkles as it reacts.
Apply multiple thin coats rather than one opaque coat. Keep gel off skin and sidewalls. If the same product wrinkles repeatedly under its recommended lamp and thickness, stop using that combination and contact the product maker instead of escalating wattage.
Tacky is not the same as uncured
Many gel systems intentionally leave an oxygen-inhibited layer that feels tacky after a correct cure. It helps the next layer bond and may be removed only when the system instructs you to do so. A soft, dentable, moving layer is different. Do not wipe a soft layer and call it cured.
The old thumbnail test is not a reliable safety test. The surface can feel firm while the center remains under-polymerized. Use the formula’s validated lamp and instructions instead.
Why the thumb is the troublemaker
Thumbs naturally angle outward and often sit near the front of a dome, where LED coverage can be weaker. Curling the thumb into the lamp creates shadows and can place the nail farther from the light. Cure thumbs flat, separated, and in the position the lamp maker describes. A compact lamp may simply not provide enough room for long extensions.
Heat spikes and low-heat modes
Builder products can release heat quickly during polymerization. A low-heat mode may ramp exposure gradually, but it does not make a mismatched lamp compatible or a thick bead safe. Remove the hand if the sensation hurts. Never ask someone to tolerate burning in the name of a faster cure.
A five-minute system check
- Confirm the exact gel type and read its lamp instructions.
- Inspect the lamp LEDs, interior, base, cord, and adapter.
- Check that the lamp is large enough for the nail length.
- Apply one thin test layer to a practice tip.
- Place the tip where the client’s nail would sit and run the complete cycle.
- Compare the result to the product’s expected finish—not a random internet test.
When to replace the lamp or the product
Replace or service a lamp when LEDs stop working, the adapter behaves irregularly, the unit overheats, or a formerly reliable system fails across multiple compatible products. Replace gel when it has thickened, separated, changed smell or color unexpectedly, or passed its useful life. A fresh lamp cannot rescue degraded product.
Frequently asked questions
Can I cure gel longer if it wrinkles?
Do not assume more time solves the problem. Check layer thickness, pigment, formula, compatibility, and placement first. Follow the gel manufacturer’s guidance.
Why does only white gel wrinkle?
Dense pigments can block light. Apply thinner layers and use the system’s validated lamp and schedule.
Why is my gel lifting after two days?
Potential causes include prep, skin contact, product incompatibility, under-cure, or a stressed nail. Do not treat lifting as proof of a weak lamp alone.
Separate application problems from lamp problems
A lamp cannot correct gel flooding the cuticle, contamination on the nail, a coat that is too thick, or an old formula that has changed texture. Before replacing equipment, recreate the service with a thin layer on a practice tip, the recommended lamp, and the complete cure time.
If the test tip cures but the client’s thumb does not, investigate placement and nail geometry. If every tip stays soft, stop the service and investigate system compatibility or lamp output.
Why dark colors need thinner coats
Dark pigment can absorb or scatter light before it reaches the lower part of the layer. White can be equally demanding. Build coverage gradually rather than applying one opaque coat. The visual goal of opacity should not override the chemical need for light to reach the full layer.
How to respond to lifting
Lifting can start with prep, product touching skin, incompatible layers, mechanical stress, or incomplete cure. Do not trap lifted material under a new layer. Remove according to the product system, inspect the nail, and correct the cause. If lifting repeats only with one lamp/product pairing, pause that pairing.
When to stop a service
- Gel touches skin and cannot be cleaned before cure.
- Heat becomes painful.
- Product is visibly soft underneath.
- The lamp’s LEDs or cord behave abnormally.
- The person reports irritation or unexpected pain.
FAQ
Can a sticky layer be wiped off?
Only when the product instructions call for it. Tacky does not always mean uncured.
Can I add another lamp?
Use the lamp the formula manufacturer recommends rather than stacking random exposure.
Why does gel cure on a swatch but not the nail?
Hand placement, thickness, curvature, and thumb shadows differ. Test the actual geometry.
Bottom line
Good curing is boring in the best way: compatible products, thin coats, clean placement, complete timing, and no improvisation when something feels wrong.
Product shrinking before the lamp
If gel pulls away from the edge while you are still applying it, look at surface contamination, excessive prep liquid, product age, and application pace. Cure one or two nails at a time if the formula moves quickly, but only within the system’s instructions.
Product shrinking inside the lamp
Contraction during polymerization can reveal an overly thick coat or product pulled from the free edge. Cap the edge lightly when instructed, avoid flooding, and do not use a giant bead to compensate for patchy color.
Why adding topcoat is not a repair
Topcoat can make the surface look glossy while leaving a failed color or base underneath. Do not seal soft material. Remove it safely and rebuild the service with correct layers and compatibility.
Lamp placement audit
- Seat the four fingers flat and centered.
- Keep them separated rather than overlapping.
- Cure thumbs flat if the dome does not expose them evenly.
- Check long free edges and sidewalls for shadows.
- Do not let nails touch the lamp interior.
Equipment audit
Confirm the correct adapter is installed, the cable is secure, timers complete normally, and every diode appears operational. Clean cured product that blocks LEDs according to the manual. Stop using a lamp that flickers, smells unusual, overheats, or has damaged wiring.
Product audit
Check batch age, storage conditions, texture, separation, and whether bottles sat in direct lamp light. UV-range exposure can begin curing product at the brush or bottle neck. Keep open bottles away from the lamp.
When irritation appears
Remove uncured product from skin and discontinue the service. Persistent redness, swelling, blistering, or pain requires qualified medical advice. Do not diagnose an allergy from a blog post and do not continue exposure to “see if it improves.â€
Why prep can look like a curing problem
Oil, dust, moisture, and product on skin can cause lifting even when the gel itself cured. Follow the system’s prep steps without aggressively thinning the natural nail. More filing is not a cure fix.
Why mixing base, color, and top can fail
Each layer may contain different chemistry and cure requirements. Cross-brand manicures can appear successful while creating uncertain interfaces. If you mix, obtain compatibility guidance from the product makers rather than relying on one lamp timer for all layers.
Seven mistakes that create repeat failures
- Using one thick coat to reach opacity.
- Letting thumbs tilt outside the diode zone.
- Leaving gel on skin during cure.
- Assuming a sticky layer is always uncured—or always normal.
- Using a flash lamp as the final cure without validation.
- Extending time instead of checking compatibility.
- Keeping bottles open beside an operating lamp.
Dark color protocol
Apply the thinnest even coat the product supports. Keep the brush pressure controlled so pigment does not pool at sidewalls. Cure for the complete prescribed cycle, then repeat with another thin coat if opacity is needed. If the system still wrinkles, stop using that pairing.
Builder gel protocol
Follow the brand’s architecture and lamp requirements. Use low-heat mode when instructed, remove the hand for painful heat, and do not assume a clear builder is automatically easy to cure at any thickness.
Post-cure inspection
Inspect for wrinkling, soft pockets, discoloration, lifting edges, and product on skin. Do not perform destructive home “tests†and call them proof of full cure. Manufacturer validation remains the stronger standard.
Storage problems
Store gel closed, upright, and away from heat and UV-range light. Product can begin polymerizing near the bottle neck when exposed to a lamp. A thick, stringy, or contaminated bottle can create application problems that resemble lamp failure.
What a good troubleshooting note records
Record product brand, shade, batch/age, coat thickness, lamp model, timer, placement, and symptom. Patterns become visible when details are consistent. “Lamp bad†is not enough information to correct the system.
Final safety reminder
If a service repeatedly fails, pause rather than experimenting on your nails. A qualified nail professional or product manufacturer can identify system-specific problems more safely than a longer timer and a higher wattage claim.
Avoid the endless-cure loop
When a manicure fails, repeating the timer can create a false sense of action. Stop, identify the symptom, verify the formula and lamp, correct the coat thickness or placement, and restart only when the system is understood. More exposure is not a diagnosis.
Editorial standard: Specifications describe intended design, not laboratory verification. When a listing and a gel manufacturer disagree, follow the gel system or stop using the pairing. Keep product off skin and seek qualified help for persistent irritation.
The bottom line
A good cure is a coordinated process. Thin coats, correct lamp/formula pairing, clean LEDs, flat placement, and full manufacturer timing beat a bigger wattage number almost every time.