
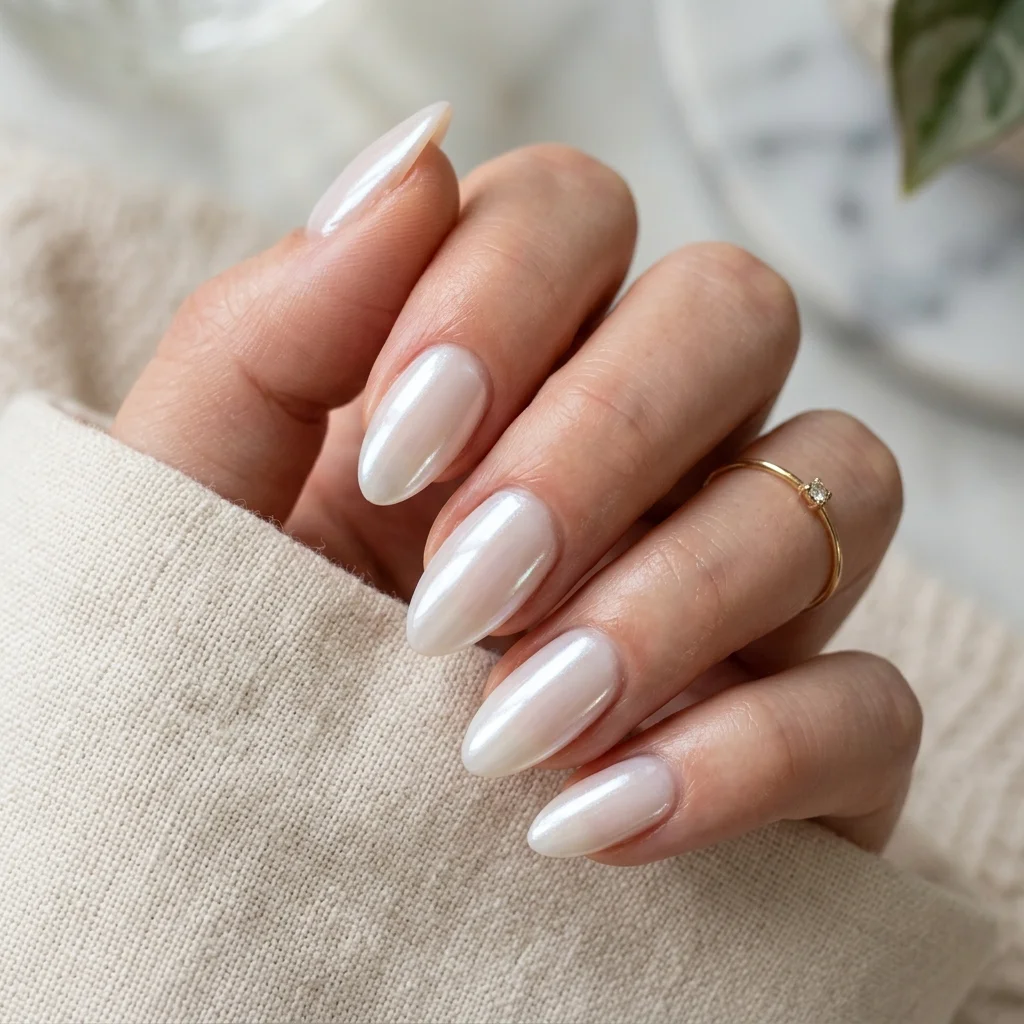
The Ultimate Glazed Donut Nails Tutorial: Your Chrome Powder Bible
So, you're scrolling through your feed and see those nails. They look like a perfect, luminous pearl—smooth, glossy, and with a soft, ethereal glow that shifts with every movement. You've just witnessed the glazed donut nail trend, and I get it. It's mesmerizing. As a nail tech who's done hundreds of these sets, I'm here to demystify the process and give you my tried-and-true glazed donut nails tutorial.
Forget streaky, patchy chrome results. I'm going to walk you through every single step, from essential prep to my secret sealing technique. Plus, I've personally tested the most popular white pearl chrome powders on the market so you can pick the perfect one for your nail kit.
Why This Trend Sticks Around
This isn't just a flash-in-the-pan fad. The appeal is in its versatility and sophistication. Glazed donut nails work on everyone. They complement every skin tone, look amazing with any outfit, and give off a clean, luxurious vibe without being overwhelming. It’s the manicure equivalent of a perfect white t-shirt and jeans—timeless, but with a major wow factor. The key is in that specific pearlescent sheen, which is achieved not with a shimmer polish, but with a fine chrome powder buffed into the nail.
Your Step-by-Step Glazed Donut Nails Tutorial
Let's get into the nitty-gritty. Grab your supplies, and let's build this look from the ground up.
Step 1: Flawless Prep is Non-Negotiable
Chrome powder is unforgiving. It will highlight every tiny ridge, hangnail, or bit of oil on the nail plate. Perfect prep is 80% of the battle.
- Cuticle Work: Push back and remove any dead skin from the nail plate. I use a cuticle bit on my e-file for precision, but a good liquid cuticle remover and pusher work too. The goal is a clean, smooth canvas from sidewall to sidewall.
- Shape & Buff: Shape the nail to your desired look (almond and coffin are stunning for this). Then, gently buff the entire natural nail surface with a 180-grit file. You're not trying to thin the nail, just removing the shine to create a gritty surface for the base coat to grab onto.
- Dehydrate & Prime: Wipe the nail thoroughly with a lint-free pad and acetone or a nail dehydrator. Follow with a non-acid primer if your system uses one. Let it air dry completely.
Step 2: The All-Important Base Color
This is a big secret. You don't apply chrome to a bare nail. The base color dictates the final tone of your glazed donut.
- For a Classic, Cool Glaze: Use a sheer milky white or very pale pink builder gel or gel polish. Apply one thin, even coat and cure fully. This provides the perfect neutral backdrop.
- For a Warm, Vanilla Glaze: Try a sheer beige or ivory shade. It gives a slightly warmer, more "donut-like" glow.
- Pro Tip: Avoid stark, opaque white. It can make the final result look chalky and reduce that depth we're after.
Step 3: The Chrome Powder Application - This is the Magic
Now for the star of the show. Here's how to get that flawless, mirror-like finish.
- Apply a No-Wipe Top Coat: This is CRITICAL. You need a gel top coat that cures to a completely smooth, non-tacky finish. Apply a thin, even layer and cure according to the manufacturer's instructions (usually 60 seconds in an LED lamp).
- Let it Cool: Wait 10-15 seconds after curing. If the nail is too warm, the powder won't adhere evenly and will look splotchy. I usually work on one nail at a time.
- Grab Your Powder: I use a small, soft eyeshadow brush or the applicator that comes with the powder. Pick up a tiny amount—you can always add more.
- Buff, Don't Rub: This is the secret motion. Using light, circular motions, buff the powder onto the cured top coat. Start from the cuticle and work your way to the free edge. You'll see it transform from a messy powder to a stunning, liquid-metal sheen.
- Dust Away Excess: Use a fluffy brush to gently sweep away any loose powder from the sidewalls and cuticle area.
Step 4: Seal the Deal (Properly!)
This step is where many tutorials fail. Sealing chrome incorrectly leads to dulling, peeling, or that dreaded "frosting" effect.
- Dip in Alcohol: Take a lint-free pad soaked in 90%+ isopropyl alcohol and give the entire nail a firm wipe. This removes any microscopic loose particles that would otherwise get sealed in and ruin the smooth finish.
- Apply a Flexible Top Coat: Apply a generous, even coat of a high-quality non-wipe gel top coat. Some techs swear by a rubber base or builder gel for even more durability. Cap the free edge well!
- Cure Fully: Cure for a full cycle. Do not skip or shorten this step.
Chrome Powder Showdown: We Tested the Top Contenders
Not all white pearl chrome powders are created equal. I put five popular ones through their paces to see which deliver the ultimate glazed donut effect.
| Product Name | Finish & Tone | Ease of Use | Best For |
|---|---|---|---|
| Young Nails Synergy Gel - White Pearl Chrome Powder | High-shine, cool-toned pearlescent. Very "icy" and modern. | ★★★★★ Incredibly fine and smooth. Buffs out evenly with minimal effort. |
Techs and clients who love a crisp, clear, fashion-forward glaze. |
| LECHAT Mood Reflective Powder - Pearl | Warmer, creamier sheen with a subtle pinkish-lavender shift. | ★★★★☆ Very easy to use, but requires a firm hand to get the shift to pop. |
Those wanting a softer, more romantic take on the trend. |
| Madam Glam Mirror Chrome - White | Intense, high-gloss mirror finish. Reflects light like glass. | ★★★★☆ Can be a bit chunky if not applied thinly. Needs a perfect base. |
Clients who want the most dramatic, true "chrome" effect. |
| Beetles White Pearl Chrome Powder (Amazon Favorite) | Decent pearlescent sheen, can read slightly glittery up close. | ★★★☆☆ Finer particles can be messy. Requires more careful application. |
Beginners or those on a budget who want to try the trend. |
| Apres Gel-X® White Pearl Chrome | Beautiful, sophisticated off-white glow. Very natural-looking. | ★★★★★ Formulated to work perfectly with their extension system. Flawless adhesion. |
Anyone using Apres Gel-X tips or those who prefer a less "in-your-face" glaze. |
My Final, Secret Pro-Tips
- Thin Layers are Everything: From your base color to your top coat, thinner is always better. Thick layers lead to wrinkling and improper curing, which will ruin the chrome effect.
- Invest in a Good Lamp: A weak or old UV/LED lamp won't cure the gel fully. This is the foundation for everything.
- The Alcohol Wipe is Mandatory: I cannot stress this enough. Skipping it is the #1 reason for a dull or textured finish.
- Practice on a Tip: Before doing a full set, practice your buffing motion on a plastic nail tip. Get a feel for how the powder behaves.
Frequently Asked Questions
Q: Can I do glazed donut nails with regular polish?
A: Honestly, no. The chrome powder technique relies on a cured gel surface. You can find pearlescent regular polishes, but they won't give you that true, light-catching, liquid-chrome effect.
Q: My chrome looks streaky or patchy. What did I do wrong?
A: This usually means either A) Your no-wipe top coat was still tacky or warm, B) You used too much powder, or C) Your base color wasn't fully cured. Go back to the prep and sealing steps—they're the most common culprits.
Q: How long does a glazed donut manicure last?
A: When done correctly with proper prep and a quality top coat, it should last just as long as any other gel manicure—typically 2-3 weeks without chipping or major dulling.
Q: Can I use this on acrylic nails?
A: Absolutely! Just make sure your acrylic is filed smooth and sealed with a no-wipe gel top coat before applying the chrome powder. The process is identical from that point on.
