There's a reason my DMs have been absolutely flooded with screenshots of those candy-like, glassy nails you keep seeing on Korean nail accounts. Jelly syrup nails are having their moment — and honestly, they've earned it. That translucent, juicy finish looks like you dipped your fingertips in fruit syrup and somehow made it look chic. I've been doing this look in my salon for months now, and every single client leaves obsessed. If you've been curious about layering sheer gels to get that dimensional, glass-like depth, I'm breaking down everything I know right here.
What Exactly Are Jelly Syrup Nails?
Think of the glossiest, most see-through candy you've ever seen. Now picture that translated onto a nail. That's the jelly syrup look. It's a translucent, buildable gel technique where you layer sheer color coats to create depth, dimension, and that signature "wet fruit" appearance. Unlike traditional gel polish that's opaque in two coats, jelly formulas stay semi-sheer no matter how many layers you pile on. The color gets richer, but the light still passes through.
The effect is somewhere between stained glass and a lollipop. You can see the nail plate underneath, which gives this organic, alive quality that full-coverage color just can't replicate. Some people call it "glass nails," others say "syrup nails" — either way, it's the translucent layering that makes it work.
I think the reason this trend took off is because it looks expensive without being complicated. You don't need fancy nail art skills or a steady hand for intricate designs. You just need the right products and a little patience with layering. The result? Nails that catch light like gemstones.
Why Translucent Gels Are Different From Regular Gel Polish
This is where a lot of nail techs (and DIYers) mess up. Translucent jelly gels behave completely differently from your standard opaque formulas. Regular gel polish is designed to self-level into full coverage. Jelly gels are intentionally sheer — the transparency is the whole point.
Here's what that means in practice:
- Curing can be trickier. Because the layers are so thin and translucent, UV/LED light passes right through. That sounds like it should cure faster, but it actually means you need to be deliberate about cure times and lamp placement.
- Layering is everything. One coat looks barely there. Two coats give you a wash of color. Three to four coats? Now you're building that gorgeous depth that makes syrup nails look like syrup.
- Blending is easier. Sheer polishes are incredibly forgiving. If your gradient isn't perfect, the translucency hides minor imperfections in a way opaque formulas never would.
- Color shifts with each layer. A jelly that looks baby pink in one coat might turn into a rich berry by the fourth. You've got to test your color story before committing to a full set.
The Two Gel Sets I Reach For Most
I've tried a bunch of translucent and candy-effect sets over the past year. Two keep coming back into my rotation, and they serve slightly different purposes. Let me break them down.
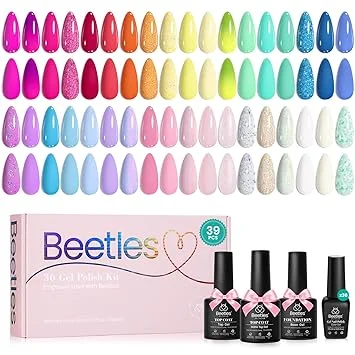
Beetles 39pcs Neon/Candy Set
This set is massive — 39 bottles of sheer, punchy color. Think neon pinks, electric oranges, juicy purples, and those candy-bright shades that look incredible in summer. The formula is genuinely jelly-sheer, not a "sheer" that's actually opaque in two coats like some brands market. Each bottle stays translucent even at four coats, which is exactly what you want for this technique.
I love this set for bold syrup gradients. The neon shades practically glow when you layer them over a white or nude base. My favorite combo is using the coral shade (it's labeled C09 in the set) layered over a milky white builder base — it gives this gorgeous watermelon candy effect that clients lose their minds over.
The formula is on the thinner side, which is both a blessing and a slight annoyance. It spreads beautifully and blends like a dream for gradients. But if you load too much on the brush, it floods the cuticle fast. I've learned to use thin coats and build slowly.
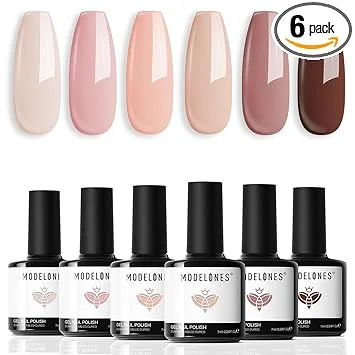
Modelones Nude/Jelly Set
This is my go-to for the "your lips but better" equivalent of jelly nails. The set leans into nudes, mauves, peaches, and soft pinks — all in a jelly formula. It's more "I woke up with these naturally gorgeous nails" rather than the candy-neon look.
The formula is slightly thicker than Beetles, which gives you more control during application. Each coat builds color noticeably but never goes opaque. I especially love their jelly nude (shade N05, a warm peachy beige) for clients who want that expensive, clean-girl aesthetic. Three coats of N05 over a rubber base coat? Absolute perfection.
One thing I appreciate about Modelones is the self-leveling. Even if your application isn't perfectly smooth, it settles into a glassy finish during curing. That matters a lot with translucent formulas because any texture or brush stroke shows through like crazy.
| Feature | Beetles Neon/Candy (39pcs) | Modelones Nude/Jelly Set |
|---|---|---|
| Color Range | Bold neons, candy brights | Nudes, mauves, soft pastels |
| Sheerness Level | Very sheer — builds slowly | Medium-she — builds faster |
| Formula Consistency | Thin, fast-spreading | Medium, more controlled |
| Best For | Statement syrup looks, summer vibes | Everyday elegance, clean aesthetic |
| Number of Coats Needed | 3–5 for full depth | 3–4 for full depth |
| Self-Leveling | Good | Excellent |
| Beginner Friendly | Moderate (thin formula, needs care) | High (more forgiving) |
How to Build a Jelly Syrup Nail: Step by Step
Step 1: Prep Like You Mean It
Translucent nails expose everything. I mean everything. If your nail plate has ridges, discoloration, or uneven texture, the jelly formula will broadcast it to the world. Proper prep isn't optional here — it's the foundation.
- Push back and clean up cuticles thoroughly.
- Lightly buff the nail plate with a 180-grit file. Don't overdo it — just enough to remove shine and create grip.
- Wipe with alcohol or acetone to remove dust and oils.
- Apply a dehydrator and acid-free primer if your system uses them.
Step 2: Lay Your Base Foundation
I always start with a rubber base coat or builder gel in a milky nude shade. This does two critical things: it smooths out any remaining texture on the nail plate, and it gives you a warm, even canvas underneath the jelly layers. Without this base, your natural nail — with all its imperfections — shows through the translucency.
Cure your base for 60 seconds in a quality LED lamp (I use a 48W SUNUV lamp, and I'll stand by that thing forever). If you're using a builder gel, you might need 90 seconds depending on the brand's instructions.
Step 3: Apply Your First Jelly Layer
Pick your color. Load a small amount on the brush — seriously, less than you think. Apply one thin, even coat across the entire nail. Don't worry if it looks barely there. That's correct.
Cure for 60 seconds. I know some people speed-cure at 30 seconds with jellies, but I've had under-curing issues with translucent formulas. More on that below.
Step 4: Build With Layers 2, 3, and 4
This is where the magic happens. With each additional layer, the color deepens and the dimensional effect builds. The light refracts through multiple sheer layers, and that's what creates that syrupy, jewel-like quality.
- Layer 2: A hint of color is visible. Very "barely tinted."
- Layer 3: Now it looks like a proper jelly. The color has body but you can still see the nail bed.
- Layer 4: Rich, deep, and glossy. This is usually my sweet spot for most colors.
Cure each layer individually. Don't rush this. Each coat gets its own full cure time.
Step 5: Seal It Up
Top coat is non-negotiable. I use a no-wipe glossy top coat and cure for 90 seconds. The longer cure on the top coat gives you that impossibly glassy finish that makes jelly nails look wet. Wipe with alcohol after curing if your top coat leaves a tacky layer.
What I liked
- The depth and dimension are genuinely stunning — no art required
- Incredibly forgiving for blending and gradients
- Looks expensive and editorial without advanced skills
- Both the Beetles and Modelones sets deliver on their sheer promise
- Clients absolutely love the "glass candy" effect
What bugged me
- Takes more time than a standard gel set (4+ coats adds up)
- Translucent gels show every flaw in your prep work
- Beetles formula can be runny if you overload the brush
- Under-curing is a real risk — you've got to be disciplined with cure times
- Removing jelly gel can take slightly longer since it's layered thicker
Doing a "Syrup Gradient" — The Ombre Technique That Looks Like Pouring Honey
This is my absolute favorite way to wear jelly nails. A syrup gradient takes the translucent layering concept and applies it directionally, creating an ombre effect where color concentrates at one end and fades to almost nothing at the other. It looks like syrup dripping down the nail or color pooling at the tip. Gorgeous either direction.
Vertical Gradient (Cuticle to Tip)
Start with your base coat and first sheer layer applied normally across the whole nail. For the gradient effect, begin with your second coat:
- Coat 2: Apply color from mid-nail to the tip only. Cure.
- Coat 3: Apply color from the free edge to about two-thirds up the nail. Cure.
- Coat 4: Apply color only to the tip third of the nail. Concentrate the product there. Cure.
The result is the deepest, richest color at the tip that gradually fades to a barely-there tint at the cuticle. It mimics how light naturally hits the nail, which is probably why it looks so organic and flattering.
Horizontal Gradient (Side to Side)
This one's less common but equally beautiful, especially on longer nail shapes. Same concept — you're concentrating layers toward one side of the nail while keeping the other side lightly tinted. I like to start the concentration on the thumb-side (lateral edge) and fade toward the pinky side. It creates this asymmetrical, editorial feel.
Pro Tip for Seamless Blending
The trick to avoiding harsh lines in a jelly gradient? Don't let your color layers dry before moving on. Apply, and then use a clean dry brush to gently feather the edge where the color stops. The sheer formula responds beautifully to this — it diffuses into nothing. Then cure. If you wait too long and the gel starts to set on its own, you'll get a visible line that the translucency can't hide.
Curing Translucent Gels Properly — The Stuff Nobody Talks About
This is where I see the most mistakes, and it's worth its own section because under-cured gel is a genuine health risk, not just an aesthetic one.
Here's the problem: translucent gels let light pass straight through them. You'd think that means they cure faster, but the opposite can be true. Many jelly formulas are designed to stay flexible and self-leveling, which means they have a different photoinitiator profile than opaque gels. They need adequate light exposure to cross-link fully.
- Use a quality lamp. A cheap lamp with weak LEDs won't cut it. I cure at 48W minimum. My SUNUV and Gelish lamps have never failed me.
- Cure each layer for 60 seconds minimum. Some techs do 30-second cures with sheer gels, and that's fine for some brands, but I've tested this and I consistently get harder, more durable results at 60 seconds. The difference is especially noticeable with the Beetles candy formula.
- Don't skip the final top coat cure. I go 90 seconds on the top coat, always. It ensures the surface is fully hard and glossy.
- Check for tackiness. After curing, the inhibition layer should be thin and even. If the gel feels thick, gooey, or smeary, it's under-cured. Don't just slap a top coat on it — re-cure the problem layer.
- Position hands correctly in the lamp. With jelly gels, I make sure nails are flat and centered under the light source. Angled nails in a curing lamp can leave spots that don't get enough UV exposure. I've also seen techs cure thumbs separately because they don't fit well in the lamp with the rest of the hand — and that's the right call.
- Watch for dark colors. Deeper jelly shades (that dark cherry in the Beetles set, for instance) absorb more light. These need a full 60 seconds, sometimes more, to cure all the way through. Don't assume because it's sheer that dark shades cure at the same rate as light ones.
Best for
Anyone who loves that clean, editorial nail look without heavy nail art. Clients who want something unique but wearable. Techs who want a technique that's more about product knowledge than artistic skill. If you love the Korean nail aesthetic, soft glam, or "glass skin" vibes, this is your nail trend. Also great for shorter nails — the translucency makes shorter nails look wider and more elegant.
Skip if
You want full opaque coverage and zero nail line showing. If your natural nails are heavily damaged, discolored, or uneven, the prep required to make translucent nails look good might not be worth the effort — at least not until your nails recover. Also skip if you're impatient with layering, because this technique demands 4+ coats plus curing time between each one.
Tips for Success
- Start with a milky base. Even if you want maximum translucency, a thin layer of milky builder gel evens out the nail plate and gives your jelly color a clean canvas. It makes a massive difference in the final look.
- Test your color depth. Before doing a full set, layer your jelly color on one nail or a nail tip to see how many coats you need for the effect you want. Remember: what looks like "barely anything" in one coat builds fast.
- Use thin coats. I can't stress this enough. Thin coats cure better, blend smoother, and give you more control over the gradient. Thick coats with jelly gel turn into a gooey mess that never cures properly in the center.
- Mix your brands if needed. I've used the Beetles neon jellies for tips and the Modelones nudes for the base gradient on the same set. They play well together as long as you cure between brands. Don't be afraid to cross-pollinate your collection.
- Keep your brush clean. Wipe your brush on a lint-free wipe between coats. Residual color buildup on the brush creates streaks in your next layer, and streaks are extra visible through translucent gel.
- Invest in a good glossy top coat. The top coat is doing a lot of heavy lifting here. It needs to be ultra-glossy, self-leveling, and non-yellowing. I've been using the Beetles no-wipe top coat and it stays glassy for weeks.
- Photograph in natural light. Jelly nails are gorgeous under any lighting, but they absolutely come alive in natural sunlight. If you're taking portfolio shots, do it by a window. The depth and light refraction are unreal.
- Warn clients about removal. Multiple layers of gel mean more product to soak off. Set expectations: removal will take 15-20 minutes of soaking versus the usual 10. Better yet, offer e-file removal if you're trained and equipped for it.
Frequently Asked Questions
Can I do jelly syrup nails with regular nail polish instead of gel?
Technically you can try it with sheer regular polishes, but honestly, it won't look the same. Gel has a built-in gloss and depth that regular polish just doesn't have. Regular polish also dries between coats, which makes blending gradients nearly impossible. If you're serious about this look, gel (or gel-x extensions with jelly gel on top) is the way to go. The translucency, the glassy finish, the way light passes through — that's all gel chemistry at work.
How many coats do I actually need for a good syrup effect?
It depends on the color and brand. With the Beetles neon set, I typically do 4 coats for a rich look. With Modelones nudes, 3 coats usually does it. The key is to go one coat at a time and evaluate. You can always add another layer, but you can't easily take one away without starting over. My rule of thumb: if you can still clearly see the white of your base coat through the color, you need one more layer.
Will jelly nails stain my natural nails?
With proper base coat application, staining is rare. I always recommend a rubber base coat or builder gel underneath the jelly layers — it acts as a barrier. That said, if you skip the base and apply neon jelly gel directly to the nail plate, yes, some staining is possible, especially with reds, oranges, and deep pinks. Always use a base coat. Always.
Can I combine jelly syrup nails with nail art?
Absolutely, and it looks incredible. I love doing minimalist line art or tiny decals over a jelly base — the art looks like it's floating inside the nail. You can also do chrome powder over jelly for a "glazed jelly donut" hybrid look that's been trending hard. Gel stickers and foils work great too. The translucent base just adds so much dimension to any art layered on top.
How long do jelly syrup nails last?
In my experience, just as long as a standard gel set — 2 to 3 weeks with proper application and cure. The multiple layers actually add durability, similar to how builder gel strengthens the nail. I haven't noticed any difference in wear time between jelly sets and regular gel sets. The top coat matters most for longevity, so make sure your top coat is high quality and fully cured.
I genuinely think jelly syrup nails are one of those trends that'll stick around. They're not a gimmick — the technique is rooted in solid layering principles and the look is universally flattering. Whether you go bold with the Beetles candy shades or keep it understated with the Modelones nudes, you're going to end up with nails that look like tiny, polished gemstones. Give it a try on your next set, take your time with the layers, and I promise you'll see why every nail tech I know has been obsessing over this look. Happy layering!