
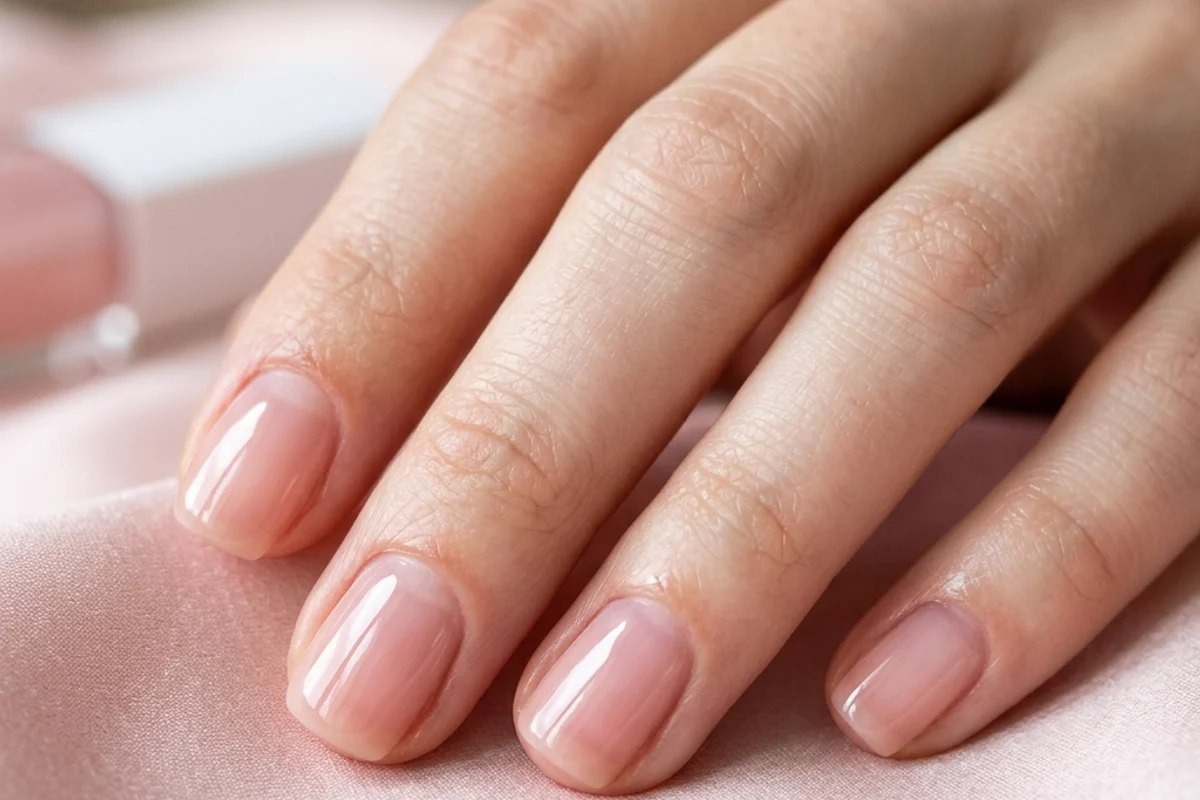
Lip Gloss Nails: The Sheer, Squishy-Looking Trend Everyone Wants
Hey everyone, it's your friendly neighborhood nail tech here, and I am obsessed with the latest look flooding my feed and my salon chair: lip gloss nails. If you've ever admired that perfect, high-shine, wet-looking pout and wished you could wear it on your fingertips, your wish is my command. This isn't your grandma's frosted finish or a basic clear coat. The lip gloss nails trend is all about that plump, glassy, almost edible-looking sheen that makes your nails look healthy, hydrated, and incredibly chic. Let's break down exactly what this is and how you can get the look at home.
What Exactly Are Lip Gloss Nails?
Think of your favorite sheer, juicy lip gloss. Now, imagine that exact finish on your nails. That's the vibe. The key characteristics are:
- Extreme Shine: We're talking a wet, reflective finish that mimics the light-reflecting properties of a glossy lip product. It's not a subtle shimmer; it's a full-on gloss.
- Sheer Color: The tint is barely-there, offering a wash of color—think soft pinks, milky nudes, or even a clear, "my nails but better" effect. The color doesn't fully obscure the natural nail underneath.
- Squishy Dimension: This is what sets it apart. The best squishy gel nails 2026 versions have a plump, almost cushion-like quality. The layers of gel create a convex, rounded surface that looks soft and pillowy.
It's the perfect marriage of minimalism and statement polish. It's low-maintenance in color but high-impact in effect, giving an aura of effortless luxury.
Why This Trend is Sticking Around (And Evolving for 2026)
Trends come and go, but the sheer glossy nails look has serious staying power because it's universally flattering. It elongates the fingers, makes skin look brighter, and grows out gracefully. For squishy gel nails 2026, I'm seeing a few exciting evolutions:
- Milky & Opaque Shifts: Moving beyond sheer pinks into more opaque milky whites and creamy beiges, still with that signature gloss.
- Subtle Glitter Infusions: We're not talking chunky glitter. Think micro-fine iridescent flakes suspended in the gloss, creating a prismatic, "oil-slick" effect that changes in the light.
- Tinted Bases: Using a soft, opaque color gel as a base (like a pale lavender or butter yellow) and then topping with a clear gloss gel for that squishy dimension.
Your Step-by-Step Guide to DIY Lip Gloss Nails at Home
You can absolutely achieve this look with regular polish, but for that true, durable, squishy effect, gel is your best friend. Here’s my professional method.
What You'll Need:
- Nail file & buffer
- Cuticle pusher & nipper
- Lint-free wipes
- Gel cleanser or 91% isopropyl alcohol
- Base coat gel (I prefer a rubberized base for better adhesion)
- THE KEY PRODUCTS:
- Sheer, tinted color gel in your chosen shade (pinks, nudes)
- Clear, high-shine builder gel or top coat (this is non-negotiable for the squish!)
- LED/UV lamp
- Cuticle oil
The Application Process:
- Perfect Your Prep: This is 90% of the battle. Shape your nails, gently push back cuticles, and buff the shine off your natural nail plate. Dehydrate the nail with a lint-free wipe and gel cleanser. No oils allowed!
- Base Coat: Apply a thin, even layer of your base coat gel. Cure it fully under your lamp according to the brand's instructions (usually 30-60 seconds). This protects your nail and gives the color something to grab onto.
- Apply the Sheer Tint: Here's where the "lip gloss" color comes in. Apply one thin coat of your sheer color gel. Don't goop it on—keep it neat around the cuticles and sidewalls. Cure. For a more opaque, milky look, apply a second thin coat and cure again.
- Create the Squish (The Magic Step): This is what gives the trend its name. Apply a thicker layer of your clear builder gel or high-shine top coat. You're essentially encapsulating the color. Float the brush over the nail, letting the product self-level to create a smooth, convex (rounded) surface. Avoid touching the skin. Cure.
- The Final Cure & Cleanse: Do a final 60-second cure to make sure everything is rock hard. Wipe each nail with a lint-free wipe soaked in gel cleanser to remove the sticky inhibition layer. This is what reveals that insane, glassy shine.
- Hydrate: Finish with cuticle oil on the skin around your nails. The contrast of the plump, glossy nail with hydrated skin is chef's kiss.
Pro Tips for a Flawless Finish:
- Thin is In: Applying your color coats too thick will cause wrinkling or improper curing. Multiple thin coats always beat one thick one.
- Cap the Free Edge: Make sure you run the brush along the very tip of your nail with each layer. This seals the edge and prevents chipping.
- Lamp Power: Ensure your lamp is powerful enough and you're curing for the full time. Under-cured gel is the #1 cause of lifting and peeling.
Product Recommendations for the Perfect Squish
Not all gels are created equal for this look. Here’s what I look for and a few of my go-to’s.
| Product Type | What to Look For | Brand Examples |
|---|---|---|
| Sheer Color Gels | Jelly-like consistency, transparent pigment, buildable opacity. | Beetles Jelly Gel Polish Set, Madam Glam Sheer Nudes, Luxio "Glow" collection. |
| "Squishy" Builder/Top Coat | Self-leveling, high viscosity (thicker), crystal-clear formula. | IGel Beauty's "Top It Off" (in the pot), Light Elegance Super Shiny, Bio Sculpture Evo Gloss Top Coat. |
| Quick-Dry Alternative (Polish) | A sheer color polish followed by a thick, high-gloss top coat like Seche Vite. | OPI's "Bubble Bath" or "Put It In Neutral" + Seche Vite Dry Fast Top Coat. |
FAQ: Your Lip Gloss Nails Questions, Answered
Q: How long do lip gloss nails last?
A: With proper prep and application, gel lip gloss nails should last a solid 2-3 weeks without chipping. The high-gloss finish might show minor surface scratches over time, but the look itself holds up beautifully.
Q: Can I do this with regular nail polish?
A: You can get a similar sheer, glossy effect with polish, but you won't get the durable, plump, squishy dimension. Polish also dries by evaporation, so the shine can dull faster. Gel cures hard under a lamp, locking in that wet look.
Q: Will this look work on short nails?
A: Absolutely! In fact, it's gorgeous on short nails. The gloss makes them look neat, healthy, and deliberately chic. The "squish" effect is just as noticeable.
Q: How do I remove gel lip gloss nails?
A: Gently! Do not peel or pry them off. File the shiny top coat layer, then wrap each nail in an acetone-soaked cotton pad and foil for 10-15 minutes. The gel should soften and you can gently push it off with a cuticle pusher.
Q: What if I get bumps or an uneven surface?
A: This usually means the gel coats were applied too thickly before curing, or the nail wasn't properly prepped (oily!). If you notice a bump before curing the final layer, you can gently wipe it off with cleanser and start that step again. Patience is key for that flawless, squishy finish.
So there you have it—the complete breakdown on how to nail the lip gloss nails trend from your own home. It’s a little practice, a little patience, and the right products, but once you get that first perfectly plump, glass-like set, you'll be hooked. It’s the ultimate "I woke up like this" for your hands. Give it a try and watch the compliments roll in.