
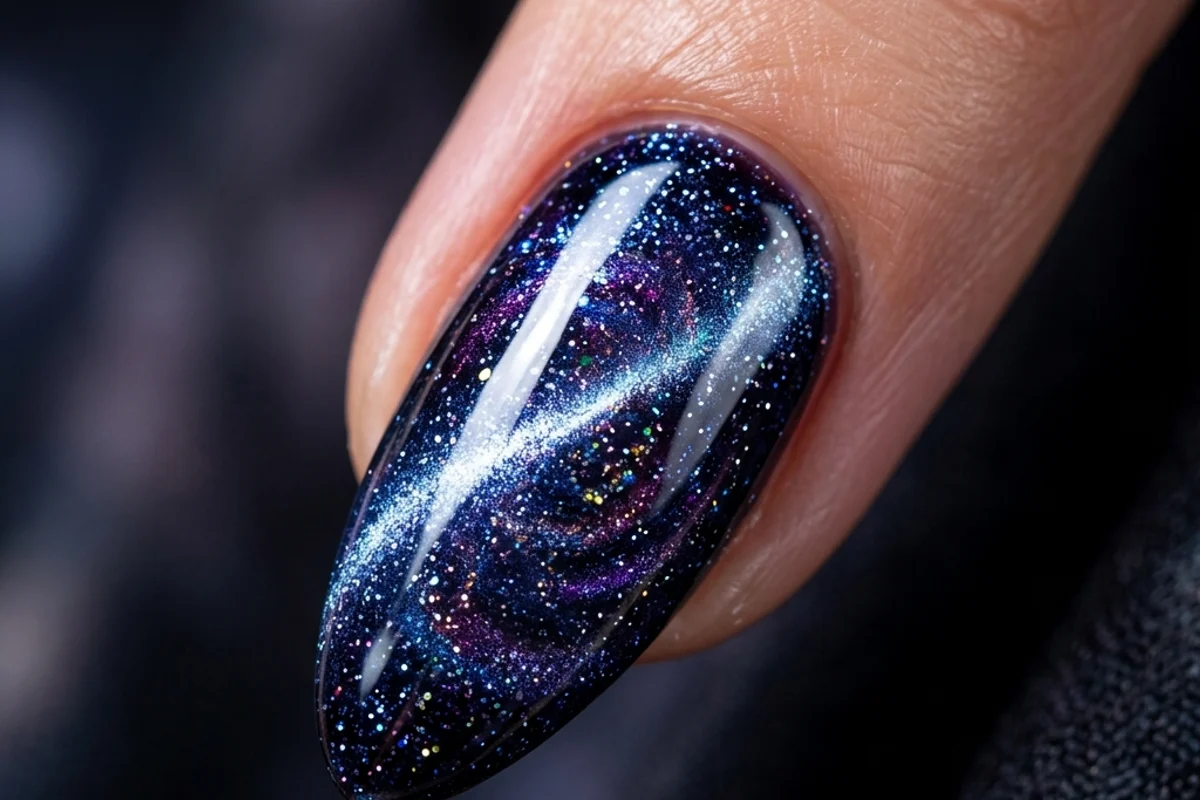
I've been painting nails for over a decade, and I can honestly say the magnetic gel polish trend is one of the most mesmerizing things I've ever worked with. There's something almost magical about watching colors shift and swirl right under your eyes. And when you combine that with a deep, cosmic theme? You get cat eye galaxy nails—a look that’s not just a color, but an entire experience. Move the magnet, change the look. Here's how to layer magnetic gels for that swirling, galaxy-deep cat eye effect that’ll have everyone asking for your secret.
What Exactly Are Cat Eye Galaxy Nails?
Let's break it down. Cat eye galaxy nails are a stunning fusion of two incredible effects. The "cat eye" part comes from the way a magnet pulls metallic particles in the gel polish to create a sharp, glowing line—just like the slit pupil of a cat's eye. The "galaxy" part is all about color. We're talking about deep, multidimensional shades—think cosmic purples, midnight blues, and blackened greens—that mimic the vastness of space. When you layer these multi chrome cat eye gels, you don't just get one line of light; you get shifting hues, depth, and a shimmer that looks light-years deep.
This isn't your average shimmer polish. It's a specialty gel with ultra-fine magnetic pigments suspended in it. These pigments react to a magnet, allowing you to "draw" patterns and create movement in the color. It’s interactive nail art at its finest.
The Magic Behind the Magnetic Gel Polish Trend
So, how does this voodoo work? It’s all about science, which is pretty cool. Inside the bottle of magnetic gel polish, you have those tiny, metallic particles—usually iron oxide—floating in the gel matrix. When you hold a specially designed magnet over the wet gel, the particles align themselves with the magnetic field. That’s what creates the iconic line or curve.
The "galaxy" effect comes from playing with color layers and magnet techniques. By applying multiple colors, each with its own magnetic reaction, you build up depth. The base might be a deep blue with a silver magnetic line, and then you layer a purple multi-chrome on top, shifting the magnet to create a second, overlapping streak. The result is a complex, shimmering canvas that changes with every angle.
This trend has exploded because it combines salon-level artistry with something clients can actually interact with. They can subtly shift the magnet themselves to see the light dance across their nails. It’s a conversation starter.
Gathering Your Tools for Multi Chrome Cat Eye Nails
Before you dive in, let's get your station set up. You can't create a galaxy without the right equipment.
- Magnetic Gel Polish: You'll need at least two to three colors for a true galaxy effect. Look for shades labeled as multi chrome cat eye gels—they often have multiple pigment shifts in one bottle. A classic trio includes a base black or deep blue, a contrasting shimmer (like silver or holographic), and a chromatic color shift (purple to green or blue to pink).
- Magnet Wand: This is non-negotiable. Most magnetic gel sets come with one, but I recommend having a few different shapes. A standard wand creates that classic cat-eye line. A wide, flat magnet can create broader, wavy effects perfect for a nebula look. Some even have star or circle designs for specific patterns.
- Base and Top Coat: A high-quality, no-wipe gel base coat is essential for adhesion and a smooth canvas. For the top coat, I always use a clear, no-wipe gel top coat. It seals everything in and makes the magnetic shimmer pop without adding any tint that could dull the effect.
- Standard Nail Prep Supplies: Don't forget your basics—nail file, buffer, cuticle pusher, lint-free wipes, and a cleanser/dehydrator. A clean, prepped nail is the foundation of any long-lasting manicure.
- UV/LED Lamp: A reliable lamp that cures your specific gel polishes is a must. Magnetic gels can be thicker, so ensure your lamp has strong, even output.
- Optional Extras: Fine detail brushes for any touch-ups, rubbing alcohol for magnet cleaning, and maybe some glitter or flakie top coats if you want to add real "stars."
Step-by-Step: Creating the Galaxy Effect
Alright, let's get to the fun part. I'll walk you through how I build these nails from the ground up. Remember, practice on a plastic tip first if you're new to this.
- Prep and Prime: Start with a flawless base. Shape the nails, push back cuticles, gently buff the nail surface, and cleanse thoroughly. Apply a thin layer of base coat and cure completely.
- The Dark Void – Your Base Color: For a galaxy, we start in space. Apply your darkest shade—like a black or a deep cosmic blue. This layer acts as the void of space. Apply it thinly and evenly, and cure it. Don't touch the magnet yet; this layer is just for color depth.
- First Nebula Layer – Adding the Cat Eye: Now, apply your first multi chrome cat eye color over the cured base. Do one nail at a time, as you need to work while the gel is wet. After applying the gel, immediately hover your magnet over the nail, about 1/8 to 1/4 inch away. Don't touch the gel! Hold the magnet still for 5-10 seconds. I like to start with a diagonal line to mimic a shooting star. Cure the nail immediately after you remove the magnet. Repeat for all nails.
- Second Layer – Building the Galaxy: This is where the magic deepens. Apply a second, different magnetic color—maybe one with a contrasting shimmer. This time, before you use the magnet, try a different angle. Perhaps a vertical line or a gentle curve. Position the magnet, hold it, and cure. You’ll see the two colors interact, creating that multidimensional shimmer. For an even deeper look, you can add a third, sheer layer of a holographic or glitter magnetic gel, using the magnet in a broad, wavy motion to create a nebula cloud effect.
- Seal the Cosmos: Once you're happy with the depth and pattern, apply a generous layer of clear gel top coat. This seals in all your hard work and adds a glass-like shine. Cure it fully. Wipe the tacky layer with a lint-free wipe and cleanser to reveal the final, dazzling finish.
Pro Tips for Flawless Cat Eye Galaxy Nails
I've made all the mistakes so you don't have to. Here are my top tips for nailing this look every time.
- Work in Thin Layers: Thick layers won't cure properly, and the magnetic particles can sink and spread out, ruining the sharp line. Thin, even coats are your best friend.
- Cure Promptly: Once you've used the magnet, get that nail under the lamp ASAP. The particles will start to disperse if you wait too long.
- Clean Your Magnet: Gel residue will build up on the magnet and weaken its pull. I wipe mine with a bit of rubbing alcohol after each nail or every few nails.
- Play with Angles: The beauty of this technique is its versatility. Don't be afraid to tilt the magnet or use different sides to create unique patterns on each nail. No two nails need to be identical—it adds to the organic, galaxy-like feel.
- Lighting Matters: Show your clients (and your photos!) in different lighting. These nails look one way under salon lights, but step into the sun, and the multi chrome shift goes absolutely wild. It's part of the appeal.
Variations on the Galaxy Theme
Once you've mastered the basic galaxy, the universe is literally your playground. Here are a few spins on the trend:
- Aurora Borealis: Use greens, teals, and purples with a wide, sweeping magnet motion to mimic the northern lights.
- Supernova: Focus on a single, explosive burst of light. Use a bright pink or orange multi chrome cat eye over black and use a dot or circle magnet design right at the cuticle area for a radiating effect.
- Deep Sea Galaxy: Swap the cosmic blues for deep ocean blues and greens. It’s like looking into a bioluminescent trench.
How to Make Your Manicure Last
A complex manicure like this is an investment. Advise your clients (and remember yourself) to wear gloves for cleaning and avoid harsh chemicals. Regular application of cuticle oil will keep the surrounding skin and the gel layer flexible and shiny. With proper application, these nails can easily last three weeks without chipping, and the magnetic effect won't fade.
Frequently Asked Questions
Can I do cat eye galaxy nails with regular nail polish?
The short answer is no. The magnetic effect relies on gel's longer working time before curing and the specific magnetic pigments in gel polish. Regular polish dries too quickly for the particles to align properly.
What if my magnetic line isn't sharp?
This usually happens if the gel layer is too thick, you held the magnet too far away, or you waited too long before curing. Try a thinner application, keep the magnet close, and cure immediately.
How many layers do I really need?
For a true galaxy effect, I recommend a minimum of three color layers: the base color, and at least two magnetic layers. But it's subjective—sometimes one perfectly applied multi chrome cat eye layer over black can look incredibly deep and stunning. Play around to find your own style.
Will the magnet work through a top coat?
No. The magnet must be used on the wet, uncured magnetic gel layer. Applying it over cured top coat won't do anything. Always use the magnet before the final top coat is applied and cured.
So there you have it—a complete guide to creating these out-of-this-world nails. The cat eye galaxy nails trend is here to stay because it’s more than a color; it’s a dynamic, personalized piece of art. Now grab your magnet and start creating your own cosmic masterpiece.