I’ve seen a lot of nail trends come and go. The massive 3D charms, the chunky glitters, the “more is more” maximalist looks have had their moment. But right now, in my chair and on my feed, there’s a definite shift happening. We’re going bare. Well, almost. We’re talking about micro nail art—those tiny, impossibly delicate designs that make you lean in close and say, “Wait, you *hand-painted* that?” It’s about clean, healthy-looking nails with just a whisper of artistry: a single miniature cherry on an accent nail, a ring of microscopic dots, a tiny floral sprig at the cuticle. This isn’t a step back from creativity; it’s a refinement. It’s about precision, restraint, and letting the natural nail be the star. Let’s get into how to master this elegant, modern look.
The Charm of the Tiny: Why Micro Art is Taking Over
Let’s be real, giant charms can be a headache. They catch on sweaters, they’re a nightmare to remove without ruining the nail underneath, and honestly, they can feel a bit dated. The micro art trend is the antidote. It’s sophisticated. It’s office-appropriate for even the strictest dress code. It’s for the client who wants art but wants to whisper, not shout. Think of it like a delicate gold necklace versus a statement costume piece—both have their place, but one feels timeless. This style also plays perfectly into the “clean girl” aesthetic and the enduring love for natural nail health. You’re enhancing, not masking.
Your Toolkit for Precision: Choosing the Right Brushes
This is the non-negotiable part. You cannot paint a cherry the size of a pencil eraser with a big, fluffy gel brush. Your success hinges on having the right tools. I’ve tried a ton, and two sets have become my go-to micro art kits.
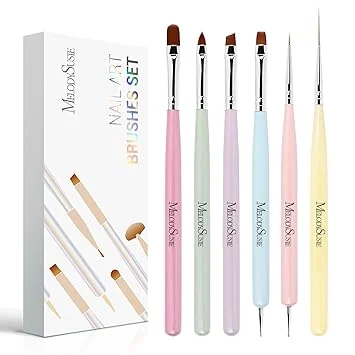
First up is the MelodySusie 6pcs Nail Art Brushes Set. This is a fantastic starting point for techs branching into detail work. The set is affordable, and the brushes have a nice, sturdy metal ferrule that doesn’t shed hairs. For micro art, you’ll live by the two smallest liner brushes in this set. They hold their point beautifully when loaded with the right amount of polish or gel paint.
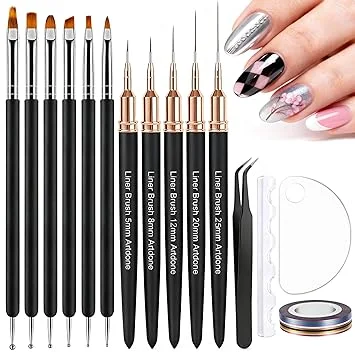
My other ride-or-die is the Artdone Nail Striping/Liner Kit. This is my “special forces” kit for the ultra-fine details. The brushes are long and flexible, which is perfect for drawing those continuous, hair-thin lines for stems or borders. The variety pack gives you different lengths, so you can experiment to find your personal favorite for different micro motifs.
| Feature | MelodySusie 6pc Set | Artdone Liner Kit |
|---|---|---|
| Best For | Dots, small petals, all-around detail work | Ultra-fine lines, striping, continuous curves |
| Brush Feel | Firm, good control | Flexible, more fluid movement |
| Price Point | $$ | $$ |
| Durability | High (with proper care) | Medium-High (flexible hairs can be delicate) |
What I liked
- Both sets give you a range of sizes to tackle any micro design.
- The MelodySusie brushes are very easy to clean and reshape.
- The Artdone brushes allow for a really satisfying, long, unbroken line.
- They’re readily available online, so you don’t have to hunt specialty stores.
What bugged me
- The MelodySusie set’s largest brush is still quite small; you’ll need other brushes for general work.
- The Artdone brushes require a very gentle touch—the flexible hairs can splay if you press too hard.
- Both sets require meticulous cleaning. Dried paint in the ferrule ruins them.
The Physical Art of Micro Control: Grip and Paint Loading
Okay, you’ve got the brushes. Now let’s talk technique, because this is where the magic—and the frustration—happens. Forget how you hold a polish brush. For micro art, your grip and your paint viscosity are everything.
The Grip
I rest my pinky finger on the client’s hand or the nail form. This creates a stable “tripod” with my thumb and index finger on the brush handle. It stops the shake. You are not drawing from your shoulder or elbow; your movement comes from your fingers and sometimes, for the tiniest motions, from your wrist. For a single dot, I might only move the brush with the tiniest squeeze of my thumb and index finger.
Paint Control and Loading
This is the secret sauce. You cannot dip your micro liner into a puddle of gel paint and expect to create a clean dot. You’ll get a blob. Here’s my process:
- Use a Gel Paint or Thick Polish: Runny polish is your enemy. I use potted gel paints (like those from F Gel or Masterpiece) because they stay put where you place them.
- The “Wipe and Tap” Method: Dip your brush, then wipe a good 80% of the product off on the edge of the pot. You want the brush loaded, but not saturated. Then, tap the tip gently on a clean area of your palette (I use a silicone mat) until you see a fine, controlled point forming.
- For Dots: Use the very tip of a detail brush or a dedicated dotting tool. Even with a dotting tool, I still wipe off excess. A perfect micro dot is made in a single, confident touch-and-lift motion.
- For Lines: With your loaded, wiped liner brush, anchor that pinky. Start your line with a light touch, then apply gentle, even pressure as you pull. The line should get thicker from the pressure of the brush hairs spreading slightly. To end, slowly ease off pressure as you lift.
Step-by-Step: Painting a Micro Cherry Accent
Let’s put it all together on a classic micro motif. You’ll need your MelodySusie smallest liner, red and green gel paint, and a matte or glossy top coat.
- Prep: Complete your nail prep, apply and cure your base color. I love a sheer pink or a clean milky white for this look. Let it cure fully.
- The Berry: Load your liner brush with red gel. Wipe and tap to a point. Decide where your cherry will go—I like the lower corner near the cuticle. In one smooth motion, create a small, slightly irregular circle. Don’t aim for perfection; a little organic shape looks more real. Cure for 30 seconds.
- The Stem & Leaf: Clean your brush. With green gel, use the very tip to draw a tiny, curved “J” shape coming off the top of the cherry. For the leaf, use a slightly larger brush or the side of your liner to make a single, elongated V-shape next to the stem. Cure for 30 seconds.
- The Highlight (Optional but magical): With a white gel paint and an ultra-fine dotting tool (or the tip of a needle), place one single, tiny dot on the cherry where light would hit. This sells the 3D illusion. Cure.
- Seal: Apply your top coat carefully, making sure not to drag the design. Cure.
Best for
Clients who love minimalist fashion, those in professional settings, nail biters or those with short nails (micro art looks stunning on shorter lengths), and anyone who is hard on their hands but still wants pretty nails. It’s also a perfect intro to hand-painted art for beginners—it’s less intimidating than a full-blown landscape.
Skip if
You or your client love bold, maximalist statements. If the idea of a single, tiny design sounds boring, this trend isn’t your vibe. Also, if you don’t have the patience for meticulous cleaning and practice, you’ll get frustrated quickly.
Tips for Success
- Practice on Paper First: Seriously. Before you even touch a nail, practice your dots and lines on a piece of paper with your brushes and polish. Get the feel for the grip and the pressure needed.
- Lighting is Everything: You need bright, direct light. A good nail lamp with a flexible arm is worth its weight in gold. You can’t paint what you can’t see.
- Take Breaks: Micro art is intense on the eyes and your concentration. If your hand starts to shake, stop for a minute. Shake it out.
- Embrace the “Lemon Slice” Method: For super even micro dots, use the end of a cleaned-out gel polish bottle or a mechanical pencil lead. Dip and stamp. It’s a lifesaver.
- Less is Truly More: Fight the urge to add more. One perfect cherry is elegant. Five cherries clustered together start to look messy. Trust the space on the nail.
Frequently Asked Questions
Can I do micro nail art with regular nail polish?
You can, but it’s much harder. Regular polish dries quickly and stays runny, making fine control difficult. Gel paint is ideal because it’s thick, doesn’t dry until you cure it, and allows you to work at your own pace. If you must use polish, use the thickest, newest bottles you have and work in a very cool room to slow drying time.
How do I clean my detail brushes so they don’t get ruined?
Immediately after use, wipe the brush on a paper towel to remove most of the product. Then, dip it in a brush cleaner solution (I use a mix of monomer and brush cleaner for acrylic, or pure acetone for gel, though acetone can be harsh). Gently reshape the bristles with your fingers and let them dry flat or with the bristles pointing up. Never store them bristle-down in liquid.
My dots are always different sizes. How do I make them uniform?
This is all about consistent pressure and loading. For dots, use a dedicated dotting tool, not your brush. Make sure you load it with the same amount of paint each time (use the “wipe and tap” method). Apply pressure straight down without rocking the tool. Practice makes perfect! Your muscle memory will kick in.
Is micro art durable? Will it last two weeks?
Yes, if done correctly and sealed well with a quality top coat. The key is making sure the art is fully cured and completely covered by the top coat without smearing. Because the designs are so small, they’re less likely to catch and chip compared to large, raised decals. With proper application, they can easily last a full wear cycle.
So, there you have it. Micro nail art isn’t about being lazy; it’s about being intentional. It’s a return to the craft of painting, a focus on the beauty of the natural nail, and a challenge to your own precision. It might feel slow at first, and you’ll definitely create some wonky-looking cherries while you’re learning (I certainly did!). But the payoff—that moment a client looks at their hand and sees this tiny, perfect piece of art—is so incredibly worth it. Give your detail brushes some love, practice your grip, and start small. Literally. Happy painting!