
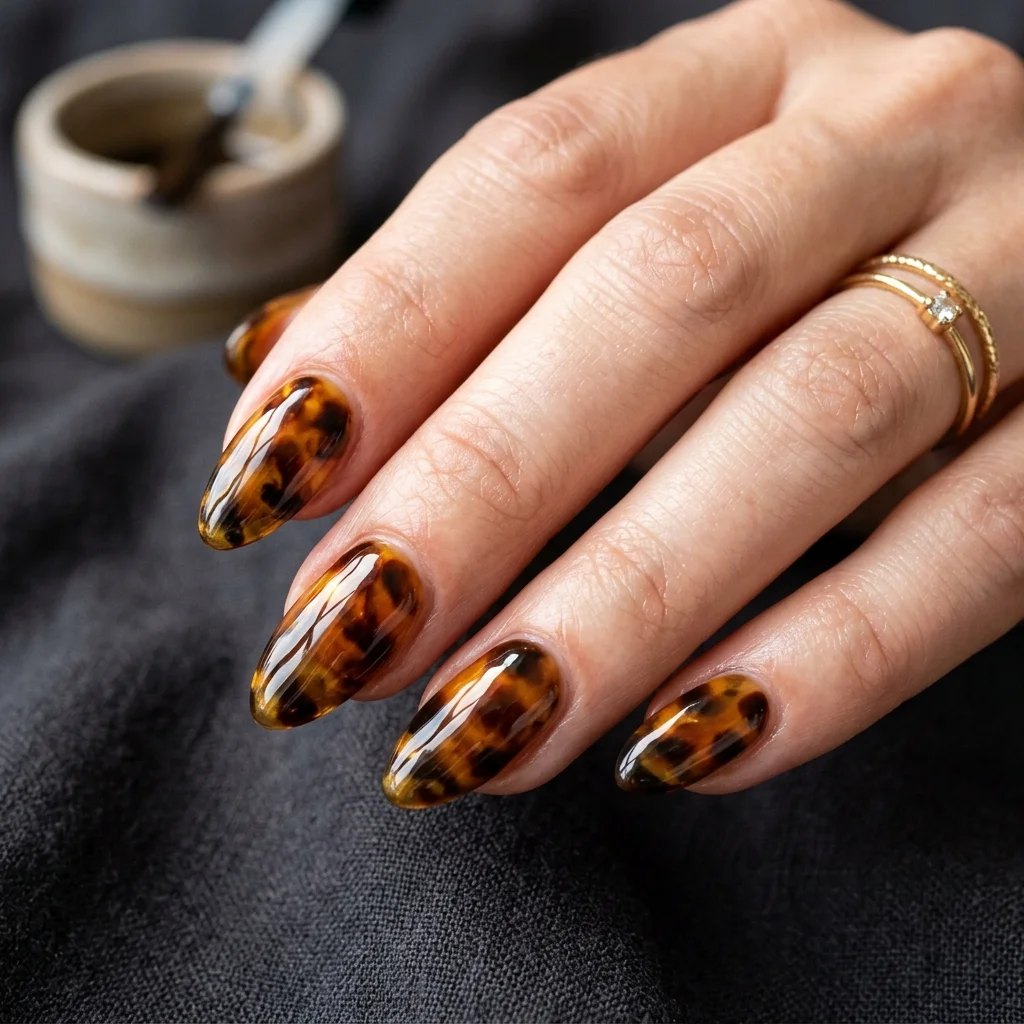
Tortoiseshell French Tips: A Chic Twist on Two Classic Looks
There's something about a French manicure that never really goes out of style. Clean, polished, and universally flattering—it's been a salon staple for decades. But you know what happens when you combine that timeless silhouette with the rich, molten depth of tortoiseshell nail art? You get one of the most gorgeous manicure trends I've painted in a long time.
I'm talking about tortoiseshell French tips, and honestly, once I started offering these to my clients, the appointment requests haven't stopped. It's the kind of look that photographs beautifully, works on any nail shape, and gets compliments everywhere you go. If you've been curious about tortie french nails or you're a fellow tech looking to add this design to your menu, I'm breaking down everything you need to know right here.
Why Tortoiseshell French Tips Are Everywhere Right Now
Tortoiseshell nail art has been trending for a few years, and for good reason. Those swirling amber, caramel, and deep brown tones create a pattern that looks almost organic—like natural stone or polished resin. It's warm, sophisticated, and pairs with literally everything in your wardrobe.
But the full-tortie look on every nail? It can feel a little heavy for some people. That's where the French tip version comes in. You're getting the drama of the tortoiseshell pattern confined to just the tip of the nail, sitting on top of a clean or nude base. The contrast is stunning. It reads as elevated and editorial without being over the top.
Here's why I think tortoiseshell French tips have taken off the way they have:
- They're wearable. The nude or sheer base keeps the overall look grounded and professional.
- They work on every nail shape. Coffin, almond, oval, square—it flatters them all.
- They photograph incredibly well. That glassy, layered tortie effect catches light in the most satisfying way.
- They bridge two trends. You get the resurgence of French tips AND the ongoing tortoiseshell obsession in one manicure.
- They're customizable. You can go warm-toned, cool-toned, subtle, or bold depending on your color choices.
What You'll Need: The Product Checklist
Before we dive into the tortoiseshell nail art tutorial, let me walk you through the supplies. I've tested a lot of different product combos, and these are the ones that give me the most reliable, beautiful results every single time.
Base Products
- Base coat: Whatever your go-to is—gel or regular polish. I usually work in gel for this design since I want that glass-like finish.
- Sheer nude or pink polish: Something like a milky nude, a translucent pink, or even a "your nails but better" shade. Two thin coats. This is your canvas.
- Top coat: A high-shine, non-wipe top coat works best if you're doing gel. You'll apply this at the very end.
Tortoiseshell Colors
This is where the magic happens. You'll need a small palette of warm-toned shades to build the tortie pattern. Here's my standard lineup:
- Dark brown or espresso: This is your base tortie tone. Something opaque in one or two coats.
- Warm amber or burnt orange: This adds those signature golden streaks.
- Translucent caramel or honey: A semi-sheer shade that bridges the lighter and darker areas.
- Black (optional): For adding depth and definition in small, strategic spots.
- Warm gold shimmer or foil (optional): If you want that extra luxe dimension.
Tools
- A thin liner brush or detail brush (size 0 or 00 works great)
- A dotting tool (small tip)
- Isopropyl alcohol or gel cleanser for thinning and blending
- A small palette or piece of foil for mixing
- Lint-free wipes
- Tape or French tip guides (optional but helpful for beginners)
Step-by-Step Tortoiseshell Nail Art Tutorial
Alright, here's the part you've been waiting for. I'm going to walk you through the whole tortoiseshell nail art tutorial from start to finish. Take your time with each step—the tortie pattern is all about layering, and patience pays off big here.
Step 1: Prep and Base
Start with your standard nail prep—push back cuticles, shape the nail, lightly buff the surface, and cleanse with alcohol or acetone. Apply your base coat and cure or dry as directed. Then apply two thin coats of your sheer nude or pink shade. You want a smooth, even base that lets the natural nail line peek through slightly. Cure or dry between coats.
Step 2: Map Out Your French Tip
This is a personal preference thing. If you're comfortable freehanding your French tip line, go for it—I usually do, using the smile line of the natural nail as my guide. But if you want a super clean edge, use striping tape or French tip guides placed just along where you want the tip to start.
For tortie french nails, I like a slightly thicker tip than a classic French. Think about 3-4mm of visible tip space. This gives you enough room to build the tortoiseshell pattern without it looking cramped.
Step 3: Build the Tortoiseshell Pattern
This is the heart of the design. Here's how I layer it:
- Start with your dark brown. Using your liner brush, paint irregular, organic blob shapes across the tip area. Don't make them uniform—tortoiseshell is beautifully chaotic. Leave gaps and spaces between the brown patches. These gaps will become the lighter amber areas. Don't cure yet if you're working in gel.
- Add the amber/burnt orange. In the spaces between your brown patches, fill in with the warm amber shade. Use your detail brush and let the shapes remain organic and slightly uneven. Some patches should touch the brown edges; others can have tiny gaps that you'll fill next.
- Layer in the translucent caramel. Dab small amounts of your sheer caramel tone into areas where you want to soften the transition between the dark and light patches. This is the step that makes the whole thing look natural and blended rather than blocky. Use a light hand—you can always add more.
- Add depth with black (optional). If you want more dimension, use your tiniest brush to add small, thin veins or specks of black in between the tortie patches. Less is more here. A few strategic dark lines make the whole pattern feel more realistic.
- Blend and adjust. Before you cure, take a step back. Look at the overall pattern. Does it feel balanced? Are there enough color variations? Touch up any areas that look too flat or too busy.
- Cure. If you're working in gel, cure this layer fully. If you're using regular polish, let it dry completely before moving on.
Step 4: Add Dimension (Optional but Worth It)
If you want that really glassy, dimensional tortoiseshell effect—which, trust me, you do—this step is key. Take a small piece of gold foil or a warm-toned shimmer polish and apply tiny flecks or patches into the tortie pattern. You're not covering the whole tip; you're just adding little moments of light that make the design look like real tortoiseshell resin. Cure or dry.
Step 5: Seal It Up
Apply a generous layer of high-shine top coat over the entire nail. For gel, I recommend a non-wipe top coat so you get that liquid-glass finish without any sticky residue. For regular polish, go with your glossiest top coat and resist the urge to touch anything for a solid ten minutes.
Pro Tips I've Learned the Hard Way
I've painted a LOT of tortie french nails at this point, and here are some things I wish someone had told me earlier:
- Warm your browns. Cool-toned browns can look muddy on the nail. Stick with warm, amber-leaning tones for that authentic tortoiseshell feel.
- Don't overthink the pattern. The whole beauty of tortoiseshell is that it's imperfect and organic. If it looks too "designed," gently mess it up a little. Seriously.
- Thin layers are your friend. Thick layers of polish or gel will look lumpy under top coat. Build the design in thin, semi-transparent layers for the most realistic effect.
- Practice on a tip wheel first. Before you paint a full set, do a practice round on plastic nail tips. You'll get a feel for the color placement and layering without any pressure.
- Use a makeup sponge for blending. If your colors aren't melting into each other the way you want, lightly dab a tiny piece of sponge over the uncured gel to soften the edges.
- Complementary base shades make a difference. A cooler nude base with warm tortie tips creates a beautiful tension. Don't be afraid to experiment with the base color.
Color Variations Worth Trying
Once you've nailed the classic warm tortoiseshell French tip (pun absolutely intended), there are some gorgeous variations you can offer your clients or try on yourself:
- Cool-toned tortie: Swap the amber for olive green and the dark brown for deep chocolate or espresso. It reads more moody and autumnal.
- Red tortie: Use burgundy, cherry red, and deep plum instead of browns and ambers. This one's perfect for fall and holiday season.
- Pastel tortie: Sheer lavender, soft peach, and buttercream yellow on a milky white base. Spring-ready and so pretty.
- Neon tortie: Bold orange, electric yellow, and hot pink. Festival season called—it wants these nails.
- Black and gold tortie: Deep black with streaks of gold leaf on a nude base. Ultra glam and perfect for a night out.
How Long Do Tortoiseshell French Tips Last?
With a proper gel application and a good top coat, I typically see tortie french nails lasting two to three weeks without chipping or significant tip wear. The pattern on the tips does hide minor wear better than a solid-color French, which is a nice bonus. Regular polish versions will give you about five to seven days depending on how rough you are with your hands.
One thing I've noticed: the tortoiseshell pattern tends to grow out more gracefully than a classic white French tip. The blend of colors and the organic shapes mean the regrowth line doesn't look as stark. Clients love that.
Frequently Asked Questions
Can I do tortoiseshell French tips with regular nail polish?
Absolutely. Gel gives you more working time to blend and layer, which I prefer, but regular polish works too. The key is working quickly and in thin layers so the colors don't get muddy.
What nail shapes work best for tortie french nails?
All of them, genuinely. Almond and coffin give you a wider tip canvas, which makes the pattern easier to paint and more visible. But I've done beautiful tortie French tips on short, natural square nails too. You just adjust the scale of the pattern.
How many coats of the tortoiseshell pattern do I need?
Usually two to three passes of color layering, plus a top coat. It's not about the number of coats so much as the visual depth you're building. Step back frequently and assess.
Can I mix tortoiseshell tips with other nail art?
Yes! I've paired tortie French tips with thin gold chrome lines, tiny gems on the ring finger, and even a single accent nail with a full tortie design. It plays well with others.
Is this design suitable for clients who are new to nail art?
It's more of an intermediate design, but with practice, even newer techs can pull it off. The key is having the right brush and not overthinking the pattern. Watch a few video tutorials, practice on tips, and you'll get there.
Final Thoughts
Tortoiseshell French tips are one of those designs that looks way more complicated than it actually is. Once you understand the layering technique and you've got the right color palette, you can knock out a full set in a reasonable appointment time. And the payoff is huge—this is the kind of manicure that makes people stop and ask, "Wait, where did you get your nails done?"
Whether you're a client looking for your next set or a tech expanding your service menu, I genuinely think tortie french nails deserve a spot in your rotation. They're elegant, they're trendy without being trendy-for-five-minutes, and they photograph like a dream. Give them a try—I think you'll be hooked.