
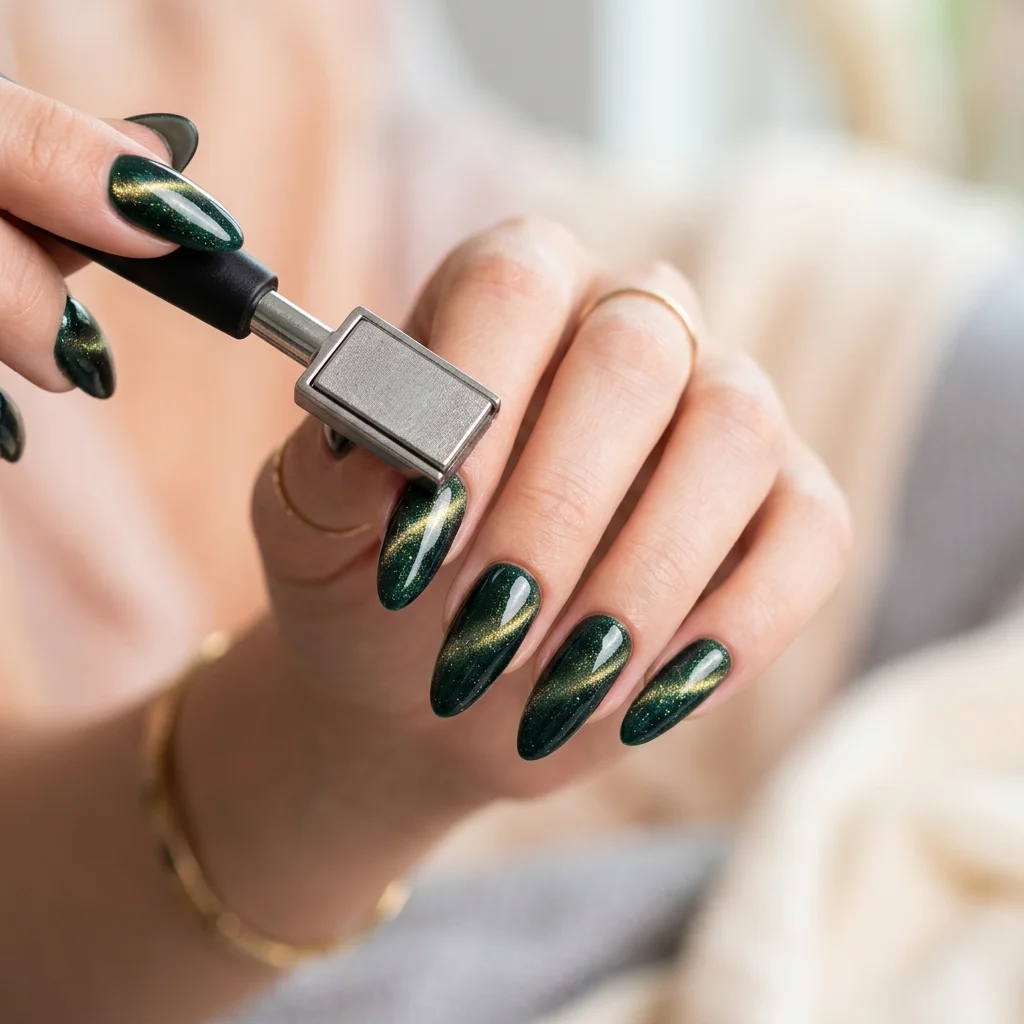
Okay, I'll admit it — when velvet magnetic nails first started popping up on my feed, I thought they were just another passing trend that would disappear in a few weeks. But here we are, and the velvet magnetic nails trend is still going strong. Clients are requesting them by name. And honestly? I totally get the hype now. There's something about that soft, multidimensional shimmer that looks like actual crushed velvet on your fingertips. It's elegant, it's moody, and it's surprisingly easy once you know the technique.
I've done hundreds of these sets at this point, and I'm going to walk you through everything — the products, the exact motions, the mistakes I made early on so you don't have to. Whether you're a fellow tech looking to add this to your menu or a DIY nail enthusiast trying it at home, this velvet nails tutorial has you covered.
What Exactly Are Velvet Magnetic Nails?
Velvet magnetic nails use specially formulated gel polishes that contain tiny metallic particles suspended in the formula. When you hold a magnet over the uncured polish, those particles shift and move to create a light-refracting effect that mimics the soft, plush look of velvet fabric. It's the same technology behind cat eye gel nails, but the technique is different — and that's what gives you that distinct cat eye gel velvet look instead of a sharp, linear stripe.
With traditional cat eye nails, you drag the magnet in one direction to create a defined streak of light. With the velvet technique, you're hovering and repositioning the magnet to spread those particles out more evenly, creating a diffused, glowing effect across the entire nail. Think of it as the difference between a laser beam and candlelight — both are beautiful, but the vibe is totally different.
Tools and Products You'll Need
Before we get into the actual velvet nails tutorial, let's make sure you've got everything on hand. I've learned the hard way that having the right setup makes or breaks this look.
- Magnetic gel polish: This is non-negotiable. You need a gel formula with magnetic particles. Regular polish won't work. I'll share my favorite shades a little later.
- Strong magnet wand: Most magnetic gels come with a small magnet, but honestly, they're often weak. I recommend investing in a dedicated neodymium magnet wand. The stronger the magnet, the more dramatic the shift. I use a double-ended wand that has both a flat side and a line side.
- Gel base coat: A good base is essential for adhesion and longevity.
- Gel top coat: I prefer a no-wipe top coat so I'm not disturbing the design when I remove the tacky layer.
- UV/LED lamp: Make sure it's compatible with your gel system. Most magnetic gels cure under LED in 30-60 seconds.
- Black or dark-colored base gel (optional): I almost always apply a black base under my magnetic shades. It makes the shimmer pop dramatically.
- Cuticle oil and cleanup tools: The usual essentials.
Step-by-Step: How to Create the Velvet Cat Eye Gel Velvet Look
Step 1: Prep the Nails
Start with a proper manicure. Push back cuticles, shape the nails, lightly buff the surface, and cleanse with a dehydrator or alcohol wipe. The better your prep, the longer these last. I always say — magnetic gel is beautiful, but it's not magic. It still needs a good foundation to stick to.
Step 2: Apply Your Base Coat
Apply a thin, even layer of gel base coat. Cure it according to the manufacturer's instructions — usually 30 seconds under LED. Don't skip this step. I've seen techs try to go straight into the magnetic gel, and the lifting starts within days.
Step 3: Apply a Dark Base Color (Recommended)
This is where I always apply a coat of black gel polish. Some magnetic gels are sheer enough that without a dark base, you lose that deep, velvety dimension. Black gives the metallic particles a rich backdrop to shine against. Apply one coat, cure fully. If the shade you're using is opaque enough on its own, you can skip this — but I rarely do.
Step 4: Apply the Magnetic Gel — One Nail at a Time
This is the most important part of the entire velvet nails tutorial, so read carefully. Here's where people mess up most often.
Apply a generous coat of your magnetic gel polish to one nail. You want it a little thicker than a normal gel coat — think medium, not thin. The particles need room to move. Now, before you cure, you have about 15-20 seconds of working time to use your magnet.
Hold the magnet wand about 1/8 to 1/4 inch above the nail surface. Don't touch the polish. For the velvet effect specifically, you want to:
- Hold the magnet over the center of the nail and let the particles pull toward the center first.
- Slowly move the magnet across the nail surface in small, hovering motions — side to side, then slightly front to back.
- Rock the magnet gently over different areas of the nail to distribute the shimmer broadly rather than concentrating it in one line.
- Rotate the angle slightly. I usually hover the magnet at different points for about 5-8 seconds total.
The goal is to move those metallic particles around enough that they create an overall soft shimmer instead of one sharp stripe. You're basically teasing the particles into a scattered, plush pattern.
Once you're happy with the look, cure immediately. Don't wait. Don't move to another nail and come back. The particles will start to settle and spread back out if you delay.
Step 5: Repeat on Every Nail
I know it's tempting to apply the magnetic gel to all five nails and then go back with the magnet. Don't do this. The gel starts to set and the particles stop responding. Work one nail at a time, every single time. It takes longer, but it's the only way to get consistent results.
Step 6: Apply a Second Coat (Optional)
For deeper color payoff, I often apply a second coat of the magnetic gel and repeat the magnet process. This doubles the depth of that velvet effect. If your client wants something more subtle and wearable, one coat over black is usually enough.
Step 7: Seal with Top Coat
Apply a thin layer of no-wipe gel top coat and cure. A word of caution here — apply the top coat gently. If you press too hard with the brush, you can drag the magnetic particles out of position. Light, float-over strokes work best.
Pro Tips for Nailing the Velvet Effect Every Time
- Stronger magnet = better results. I can't stress this enough. The cheap magnets that come with most magnetic gels are fine for cat eye stripes but weak for velvet effects. Upgrade your magnet. It's a small investment that makes a huge difference.
- Work under good lighting. You need to see where those particles are shifting. I have a daylight lamp on my station specifically so I can watch the shimmer move in real time.
- Warming the gel slightly helps. If the magnetic particles aren't responding well, try warming the bottle in your hands for a minute or two before application. Warmer gel = more mobile particles.
- Black base is your best friend. I've tried velvet nails over nude bases, over white, over dark blue. Black consistently gives the most luxurious, velvet-like result.
- Don't overwork it. A few slow passes with the magnet are enough. If you keep hovering and hovering, you'll actually end up dispersing the particles too evenly and losing that dimensional quality that makes the velvet look special.
Best Magnetic Gel Shades for the Velvet Look
Not every magnetic gel shade reads as "velvet" the same way. Some colors and particle types work better than others. Here are the shades I keep reaching for:
- Deep burgundy/wine: This is the OG velvet shade. It literally looks like red velvet cake on your nails. Perfect for fall and winter sets.
- Midnight blue: Gorgeous, moody, and dimensional. Looks amazing under indoor lighting.
- Emerald green: A showstopper. This shade gets more requests than any other in my salon.
- Champagne gold: For clients who want something lighter and more wearable. Over a nude base instead of black, this gives a soft, bridal-friendly shimmer.
- Deep purple/plum: Rich and romantic. This one photographs beautifully.
- Rose gold: Another lighter option that works well for everyday wear. The warm-toned particles catch light in the prettiest way.
Common Mistakes to Avoid
I've made all of these mistakes so you don't have to. Learn from my pain.
- Applying gel too thin: Thin coats don't give the particles enough room to move. Go medium to slightly thick.
- Working on multiple nails at once: Already said this, but it's worth repeating. One nail. Magnet. Cure. Repeat.
- Holding the magnet too close or too far: Too close and you'll disturb the polish surface. Too far and the particles won't respond. The sweet spot is about 1/8 to 1/4 inch above the nail.
- Skipping the dark base: Your velvet effect will look flat and washed out without it. Trust me on this.
- Using a weak magnet: If your results look underwhelming, the magnet is almost always the problem. Upgrade it.
- Curing too slowly after positioning: Get that hand in the lamp right away after you've arranged the particles.
How Long Do Velvet Magnetic Nails Last?
With proper prep, quality products, and a good top coat, velvet magnetic nails last just as long as any gel manicure — typically two to three weeks without chipping or significant wear. The magnetic effect itself doesn't fade or change over time. Once those particles are cured in place, they're locked in. The shimmer you see on day one is the same shimmer your client will see on day twenty-one.
One thing I will mention: because the velvet look tends to use a slightly thicker gel application, removal can take a tiny bit longer than regular gel. Extra soaking time or a few more passes with the e-file. Not a big deal, but worth mentioning to clients upfront.
Velvet Nails vs. Traditional Cat Eye: What's the Difference?
I get this question constantly, so let me break it down quickly.
| Feature | Velvet Magnetic Nails | Traditional Cat Eye Nails |
|---|---|---|
| Effect | Soft, diffused, all-over shimmer | Sharp, defined stripe of light |
| Magnet technique | Hover and scatter particles | Hold magnet in one position or drag linearly |
| Best magnet to use | Flat neodymium wand, multiple angles | Line/slit magnet for sharp stripe |
| Vibe | Luxurious, plush, subtle | Bold, dramatic, eye-catching |
| Difficulty level | Slightly more technique-sensitive | Easier for beginners |
Both use the same magnetic gel polishes — it's really just the technique that creates such different results. You can even combine them. I've done sets where the ring fingers get a traditional cat eye stripe and the remaining nails get the velvet treatment. Stunning combination.
Final Thoughts
The velvet magnetic nails trend isn't going anywhere, and I'm glad. It's one of those techniques that genuinely looks expensive and high-end, but once you've got the basics down, it's incredibly repeatable. Your clients will love it. Your Instagram will love it. And you'll love how satisfying it is to watch those particles dance across the nail under the magnet.
Start with a strong magnet, a dark base, and a rich jewel-toned magnetic gel. Practice the hovering technique on a practice wheel before you do it on a client. And remember — one nail at a time. Always.
Frequently Asked Questions
Can I do velvet magnetic nails with regular nail polish?
No, you need magnetic gel polish specifically. Regular magnetic polish exists, but it doesn't give the same long-lasting, dimensional effect that gel does. The curing process locks the particles in place permanently.
Do I need a special magnet for the velvet effect?
You don't necessarily need a "velvet-specific" magnet, but you do need a strong one. A standard neodymium magnet wand works great. The ones included in most magnetic gel kits are usually too weak for a good velvet effect.
Can I use the velvet technique with any magnetic gel color?
Technically yes, but some colors work better than others. Deep, rich shades like burgundy, emerald, and navy give the most convincing velvet appearance. Lighter shades can look beautiful too but tend to read more as "shimmery" than "velvety."
Why does my velvet effect look flat?
It's almost always one of three things: a weak magnet, gel that's applied too thinly, or the lack of a dark base coat underneath. Try fixing those variables first before changing anything else.
How is the velvet technique different from a regular cat eye gel velvet look?
With a traditional cat eye look, you hold the magnet still or drag it to create one concentrated line of light. For velvet, you hover and move the magnet across the nail to scatter the particles more broadly. The result is a diffused, plush shimmer instead of a single stripe.