
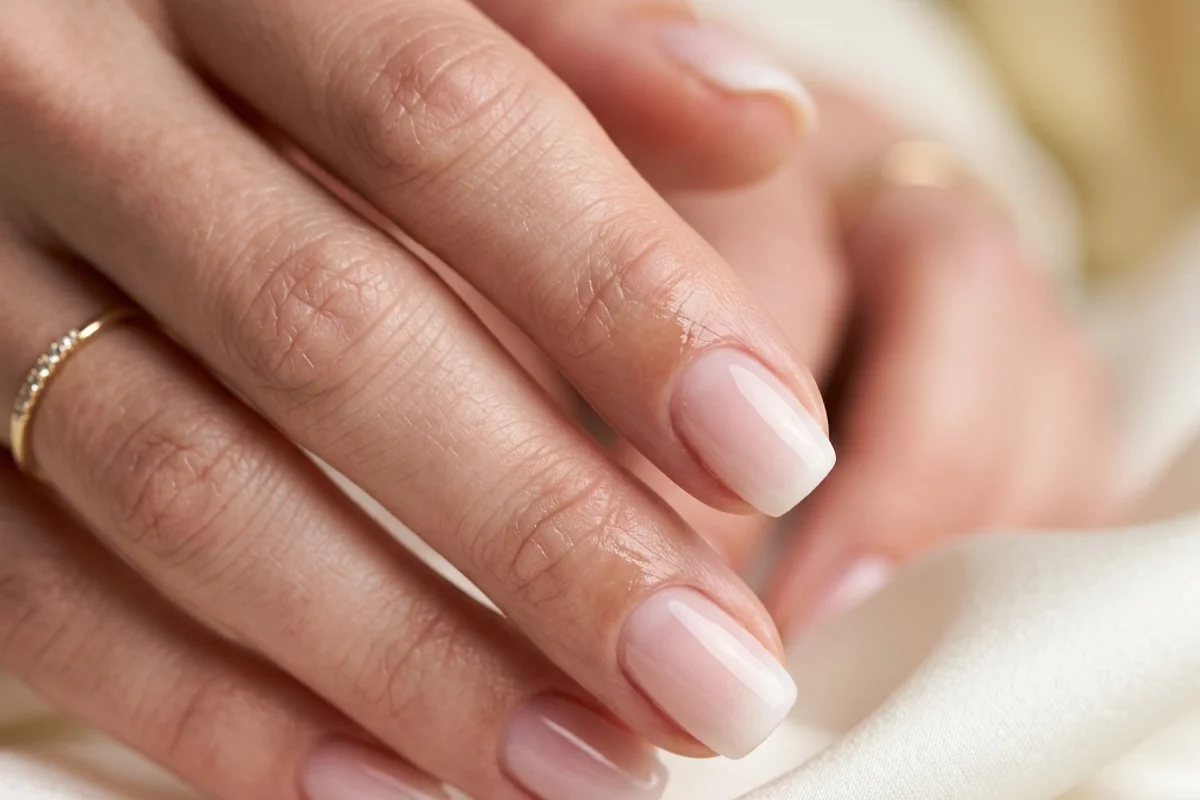
Milky French Tips: The Soft, Modern Take on a Classic
Let's be real: that stark, sharp white French tip that was everywhere in the early 2000s can sometimes feel a bit… dated. It’s like the nail equivalent of a power suit with shoulder pads—classic, but often too rigid for modern tastes. But the French manicure itself? It’s timeless. It’s elegant. It’s the little black dress of nail art. So, how do we update it? We soften it. We’ve been doing exactly that in the salon for the past year, and the result is the most requested service on my menu: milky french tips.
This look isn't about a stark line of white polish. It's about a diffused, soft-focus effect that looks expensive, elegant, and utterly chic. Think of the frosted glass of a fancy perfume bottle or the gentle haze of a morning fog. That’s the vibe. Today, I’m breaking down everything you need to know about the soft french manicure—what it is, why everyone loves it, and the exact techniques we use to create it.
What Exactly Are Milky French Tips?
At its core, a soft french manicure replaces the opaque, bright white polish tip with a sheer, milky, or translucent white shade. Instead of a solid line of color, the white pigment is diffused, creating a seamless gradient from the natural nail bed to the smile line. It’s all about nuance. The smile line (that curved line where the white tip begins) is still defined, but it’s blurred and soft, not sharp and geometric.
The base color can vary. Sometimes we use a sheer pink or nude, other times we go for a completely clean, bare-nail look with just a milky white wash over the entire nail, with the tip getting an extra coat or two for that subtle ombré effect. The magic is in the customization.
Why Are Milky White French Nails Everywhere?
I’ve got clients coming in with screenshots every single day. Here’s why this trend has serious staying power:
- It’s Universally Flattering. The soft white works with every skin tone. It doesn’t wash you out like a stark white can, and it adds a clean, healthy glow to your hands.
- It Looks Expensive and Grown-Up. There’s a certain sophistication to this look. It’s understated luxury. It suggests you care about the details without trying too hard.
- It’s Incredibly Forgiving. Grow-out is way less noticeable. With a sharp white tip, you see every millimeter of new growth at the cuticle. With a milky french, the soft gradient makes regrowth blend in seamlessly, so your manicure looks fresh for longer.
- Versatility is Key. It’s perfect for the office, a wedding, a date night, or just running errands. It pairs with literally everything in your wardrobe.
How to Achieve the Perfect Milky French Manicure
This look requires a bit more finesse than a classic French, but the payoff is huge. Here’s my pro technique breakdown.
The Polish Method (At-Home Friendly)
For clients who want to try this at home or for techs using traditional lacquer, layering is your best friend.
- Prep is Non-Negotiable. Start with a perfectly clean, shaped, and buffed nail. Push back cuticles gently. A smooth canvas is essential for a polished finish.
- Apply a Sheer Base. Use a single coat of a sheer pink, nude, or even a “blurring” base coat. Let it dry completely. This gives the nail a healthy, unified look.
- Create the Milky Tip. This is the key step. Don’t use a striper brush with opaque white. Instead, use a milky white or sheer white polish. Load your brush, wipe off the excess, and gently dab or stipple the polish onto the tip, focusing on the smile line. Then, using a clean, slightly damp brush or a makeup sponge, gently dab and blend the color upward, softening the edge. You’re essentially creating a tiny ombré.
- Seal the Deal. Once dry, apply one final coat of your sheer base color over the entire nail. This blends everything together beautifully and hides any imperfections. Finish with a high-gloss top coat for that liquid glass look.
The Gel & Acrylic Pro Method (My Preferred Salon Technique)
For the most seamless, durable, and custom result, working with gel or acrylic gives me total control.
- Build the Nail. Whether using a builder gel for an overlay or sculpting with acrylic, I create the nail shape and structure first.
- Color Placement. I often mix a tiny drop of milky white gel color into my clear or cover pink builder gel to create a custom, subtly tinted base for the whole nail.
- The Art of the Tip. I take a dedicated milky white gel (not a bright white). Using a liner brush, I paint the smile line. Immediately, before curing, I take another clean brush dipped in a bit of clear gel (or slip solution for acrylic) and gently sweep it back from the white line, pulling the pigment and diffusing it. This is called “pulling back” and it’s what creates that perfect, soft fade.
- Cure and Finish. I cure the nail, then apply a no-wipe top coat for a flawless, glossy finish that lasts for weeks.
| Feature | Classic French Tip | Milky French Tip |
|---|---|---|
| Tip Color | Opaque, bright white | Sheer, translucent milky white |
| Smile Line | Sharp, defined, geometric | Soft, blurred, diffused |
| Vibe | Retro, bold, structured | Modern, elegant, soft-focus |
| Best For | A strong, classic statement | An understated, expensive look |
| Grow-Out | Very noticeable | Blends seamlessly |
Choosing Your Perfect Shade of "Milky"
Not all milky whites are created equal. The term covers a spectrum. Here’s how to choose:
- Warm Milky: Has a hint of peach or warm pink. Beautiful on medium to deep skin tones for a natural, glowing look.
- Cool Milky: Has a touch of blue or lavender. Fantastic for fair to light skin tones, giving a clean, porcelain effect.
- True Milk: A neutral, opaque white that’s been sheered down. The most versatile and popular shade in my kit.
- Sheer Blush: Some clients opt for no white at all! We use a sheer, milky pink for the entire nail, with just a slightly thicker application at the tip. This is the ultimate “your nails but better” look.
Maintenance and Aftercare for Your Soft French Manicure
You’ve got the perfect set of milky white french nails. Now, let’s make them last.
- Oil is Your Best Friend. Apply cuticle oil daily. This keeps your natural nail and the skin around it hydrated, preventing hangnails and lifting. It also keeps the gel/acrylic flexible and shiny.
- Wear Gloves. For cleaning, washing dishes, or gardening, gloves are a must. Harsh chemicals and prolonged water exposure are the enemies of any manicure.
- Don’t Pick. If you get a tiny lift, come in for a quick fix. Picking will take layers of your natural nail with it.
- Book Your Fill. Depending on your nail growth, you’ll want a fill every 2-3 weeks. Because the look is so soft, you can often stretch it to three weeks without it looking rough, which is a nice bonus for your budget.
FAQs About the Milky French Trend
Q: Is this just a trend that will disappear?
A: I don’t think so. The milky french tips feel like a natural evolution of the French manicure, not a flashy fad. Its versatility and elegance give it classic potential.
Q: Can I get this look on short nails?
A: Absolutely! In fact, it can make short nails appear longer and more elegant. The soft tip elongates the nail bed beautifully. We just use a narrower smile line.
Q: What’s the difference between a milky French and an American manicure?
A: They’re cousins! An American manicure uses a creamier, more opaque off-white and a flesh-toned base, aiming for a more "natural nail" look. The soft french manicure is all about that sheer, diffused, modern gradient.
Q: My salon doesn’t offer this. Can I describe it to my tech?
A: Yes! Ask for: “A French manicure with a sheer, milky white tip instead of a solid white. I’d like the smile line to be soft and diffused, not sharp.” Showing a picture is always the best bet, though.
This modern take on a classic is a game-changer. It’s refined, it’s forgiving, and it just feels right for right now. Next time you’re in the chair, maybe give the milky french tips a try. I have a feeling you’ll be just as obsessed as we are.